11/01/2022
How to set up an Amazon SES transactional emailer with a custom template (part 1) -- Configuring Amazon SES

Amazon SES
Amazon’s Simple Email Service (SES) is a service that can be used in applications to send or receive email. It’s cost effective and scalable, and runs on the cloud ☁️. You can use Amazon SES to create transactional, marketing, and bulk emails.
Marketing emails are emails you send to your users for promoting your products or services. Bulk emails are mass notification type of emails sent to large groups. Transactional emails are emails triggered by events in your application, such as a new account created, or a purchase confirmation.
What I plan to discuss
In this series of articles I will show you how you can set up an emailer service with Amazon SES that will let you send transactional emails from your system to your users using custom HTML templates built with MJML.
This will allow you to send custom styled, properly verified and signed emails from a custom domain name you specify. You will also be able to review your overall email deliverability health of your emails by setting up DMARC aggregate reports.
I will go through the steps below in this series:
- How to verify a custom domain name in Amazon SES using the DomainKeys Identified Mail (DKIM) authentication standard so we can send emails.
- How to configure Amazon SES to use our custom domain name as the email sender.
- How to ensure our emails don’t land in spam using SPF, DKIM, and DMARC records.
- How to install and configure the AWS SES Javascript Client to send emails.
- How to install and configure the MJML library to create a custom responsive email template.
- How to create a script that converts the MJML markup into plain HTML and uses the SES Client to “register” the template with Amazon SES.
In this particular article I will show you how to do steps 1-3 which deal mainly with configuring our custom domain and Amazon SES to prepare it for our Javascript client integration. Let’s get started!
Requirements
- You will need to have a custom domain name already registered.
- You will need to create an Amazon Web Services account.
Before we start
Ensuring your emails don’t land in spam (SPF/DKIM/DMARC records)
I want to briefly discuss the importance of implementing SPF, DKIM, and DMARC records. This implementation is done in your custom domain’s DNS settings and each of the 3 will require that some DNS records are added to your domain.
It’s important to use these to ensure your emails do not land in recipients’ spam folders. You want to make sure you follow proper standards to increase your deliverability.
It’s also important to set these to disallow anyone from doing spoofing/phishing scams using your domain. This prevents your domain name reputation from being affected negatively which would cause more of your emails to land in spam.
Check out the below to find your sending reputation:
Let’s discuss a broad overview of each DNS record.
DKIM
This record allows you to “sign” messages sent by Amazon SES. This signature is verified when the receiving email server receives the message, to authenticate the message as legitimately being sent by your domain. Amazon SES makes generating the DKIM signatures very easy (more on this later).
Click for more info on what is the DKIM record.
Sender Policy Framework (SPF) record
This is a way to whitelist ip addresses that are known by your domain to be authorized to send emails on the domain’s behalf. We will add an SPF record to your custom domain’s DNS settings when setting up Amazon SES to send email that securely appears to originate from your custom domain name. ip addresses not whitelisted will fail SPF validation.
Click for more info on what is the Sender Policy Framework (SPF) record
DMARC
This record enables Amazon SES to indicate that the email is protected with the SPF record and/or the DKIM record. The DMARC record clearly instructs the email recipient what it should do with the message if the message validation passes or fails.
You can configure it to:
- Accept the message
- Reject the message
- Junk the message
I will show you how to set up the records below. If you’d like to do some further reading on this I highly recommend this fantastic article from dmarcly.com that goes into grueling detail on the benefits of each record, all the various settings for them, as well as general knowledge on email security.
Now that you have a basic understanding of these records and how they will help you, let’s get started with configuring Amazon SES.
The Amazon SES console can be found in your Amazon AWS account by clicking on the Amazon SES link.
Click for more info on what is the DMARC record
Adding a custom domain to Amazon SES
Entering Identity Details
Open the SES console by typing in “simple email service” in the Amazon AWS console’ search input. On the sidebar click on the “Verified identities” link.
Click on “Create identity”, and select “Domain” as the identity type to create.
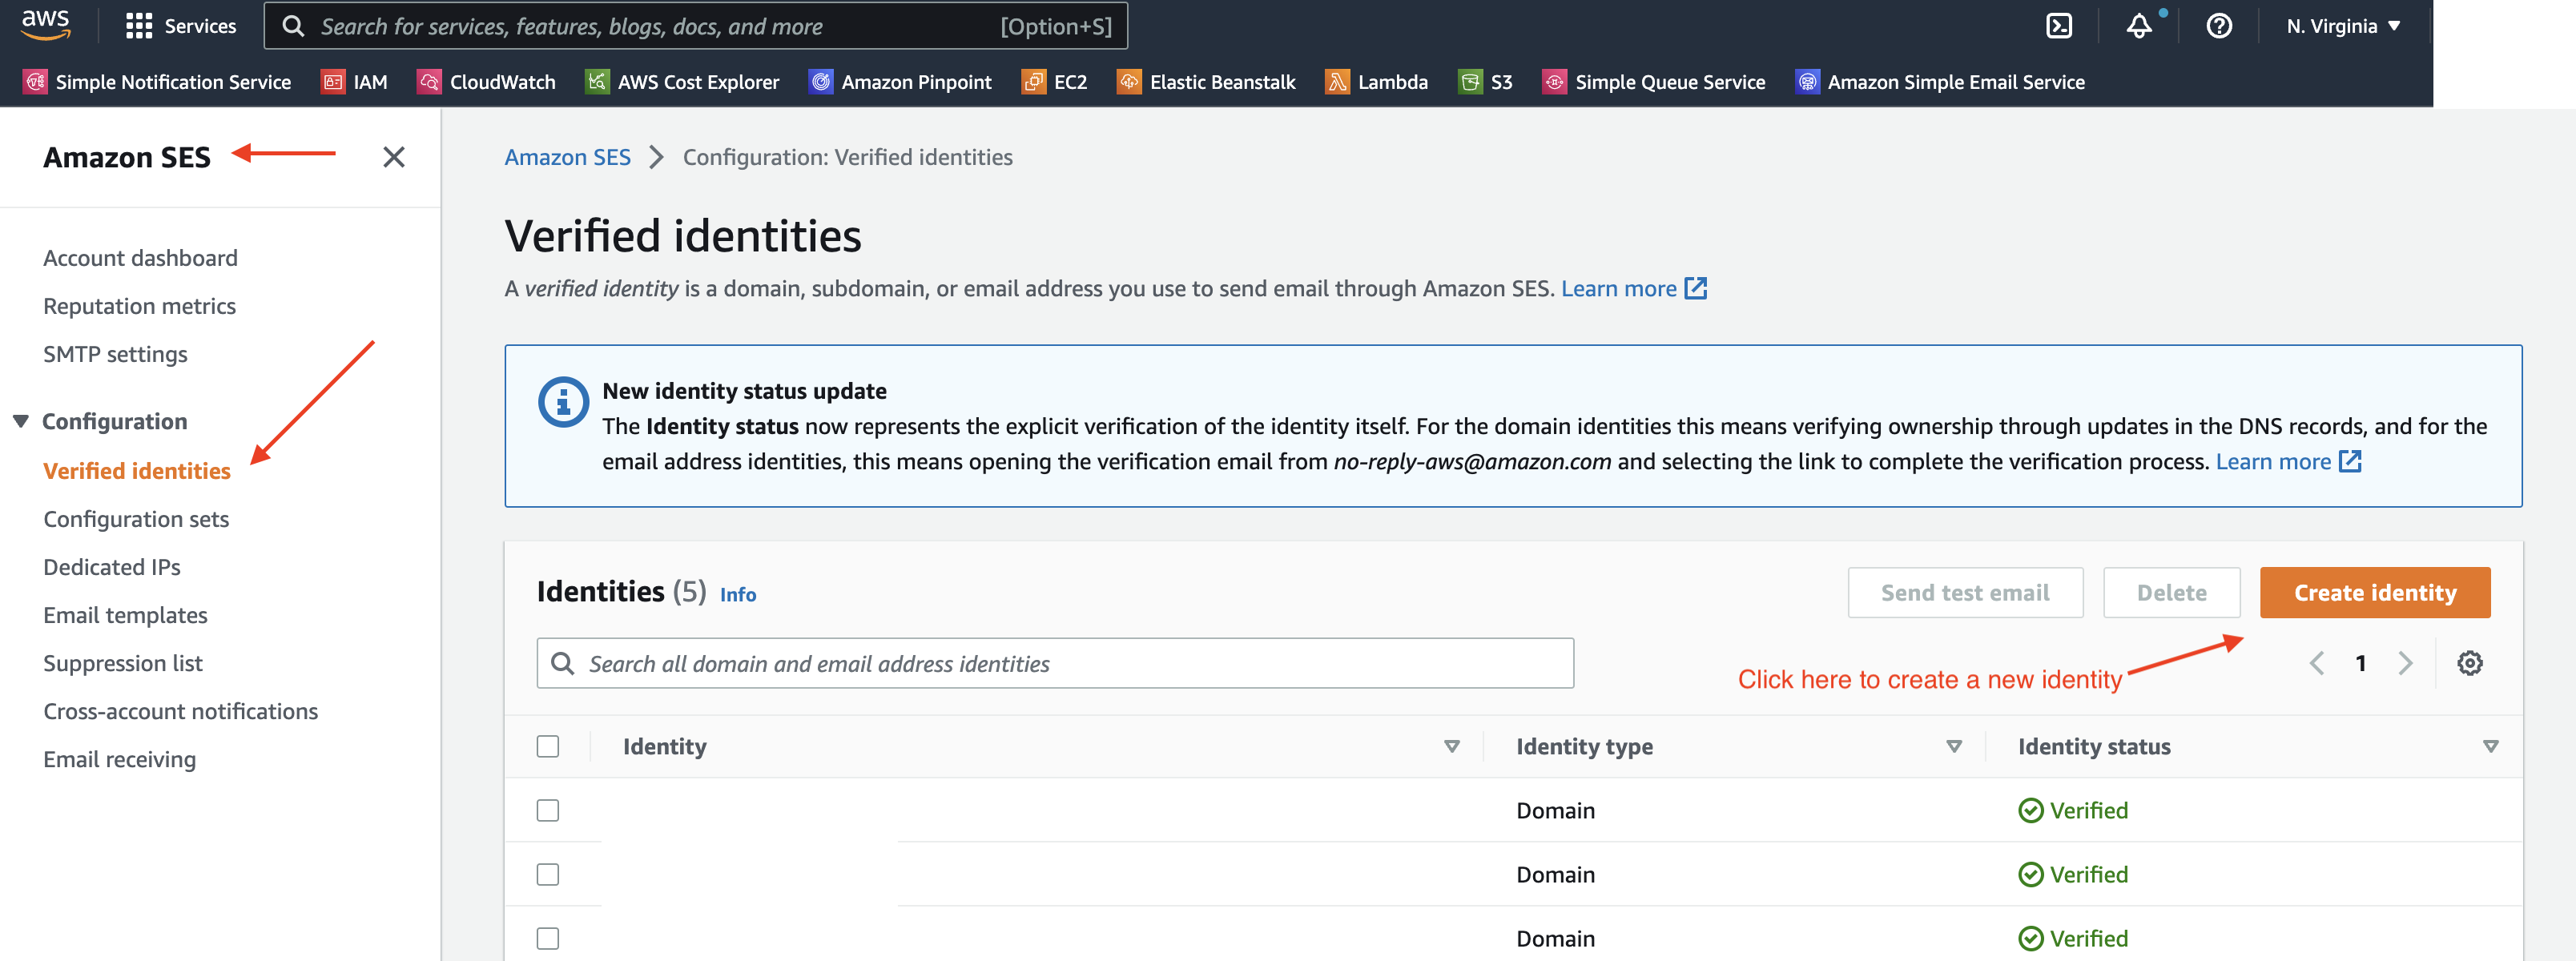
In the screen that opens, leave “Assign default configuration set” unchecked. This configuration option won’t be covered in this series but you can learn more about it in the Amazon SES documentation.
Enable the “Use a custom MAIL FROM domain” option on. Configuring this will help our emails comply with Domain-based Message Authentication, Reporting and Conformance (DMARC). Set the subdomain value to “mailfrom”, so that the full MAIL FROM domain reads “mailfrom.mycustomdomain.com”
Set the “Behavior on MX failure” to “Use default MAIL FROM domain”. This means if the MAIL FROM related mx record we will add later in this article is misconfigured, it will just default to use the Amazon SES default MAIL FROM subdomain so that your emails are sent. More on this later.
If you use AWS’s Route53 service to manage your domain’s DNS settings, you can leave the “Publish DNS records to Route53” setting enabled. This will auto-populate the DNS settings. If your DNS settings are managed somewhere else you can uncheck this option.

Verifying Your Domain
Expand the “Advanced DKIM Settings” and select “Easy DKIM”. Choose “RSA_2048_BIT” as the “DKIM signing key length”.
Check on “Publish DNS records to Route53” to auto-populate your settings if you will be using Route53 to manage your DNS.
Leave “DKIM Signatures” enabled.
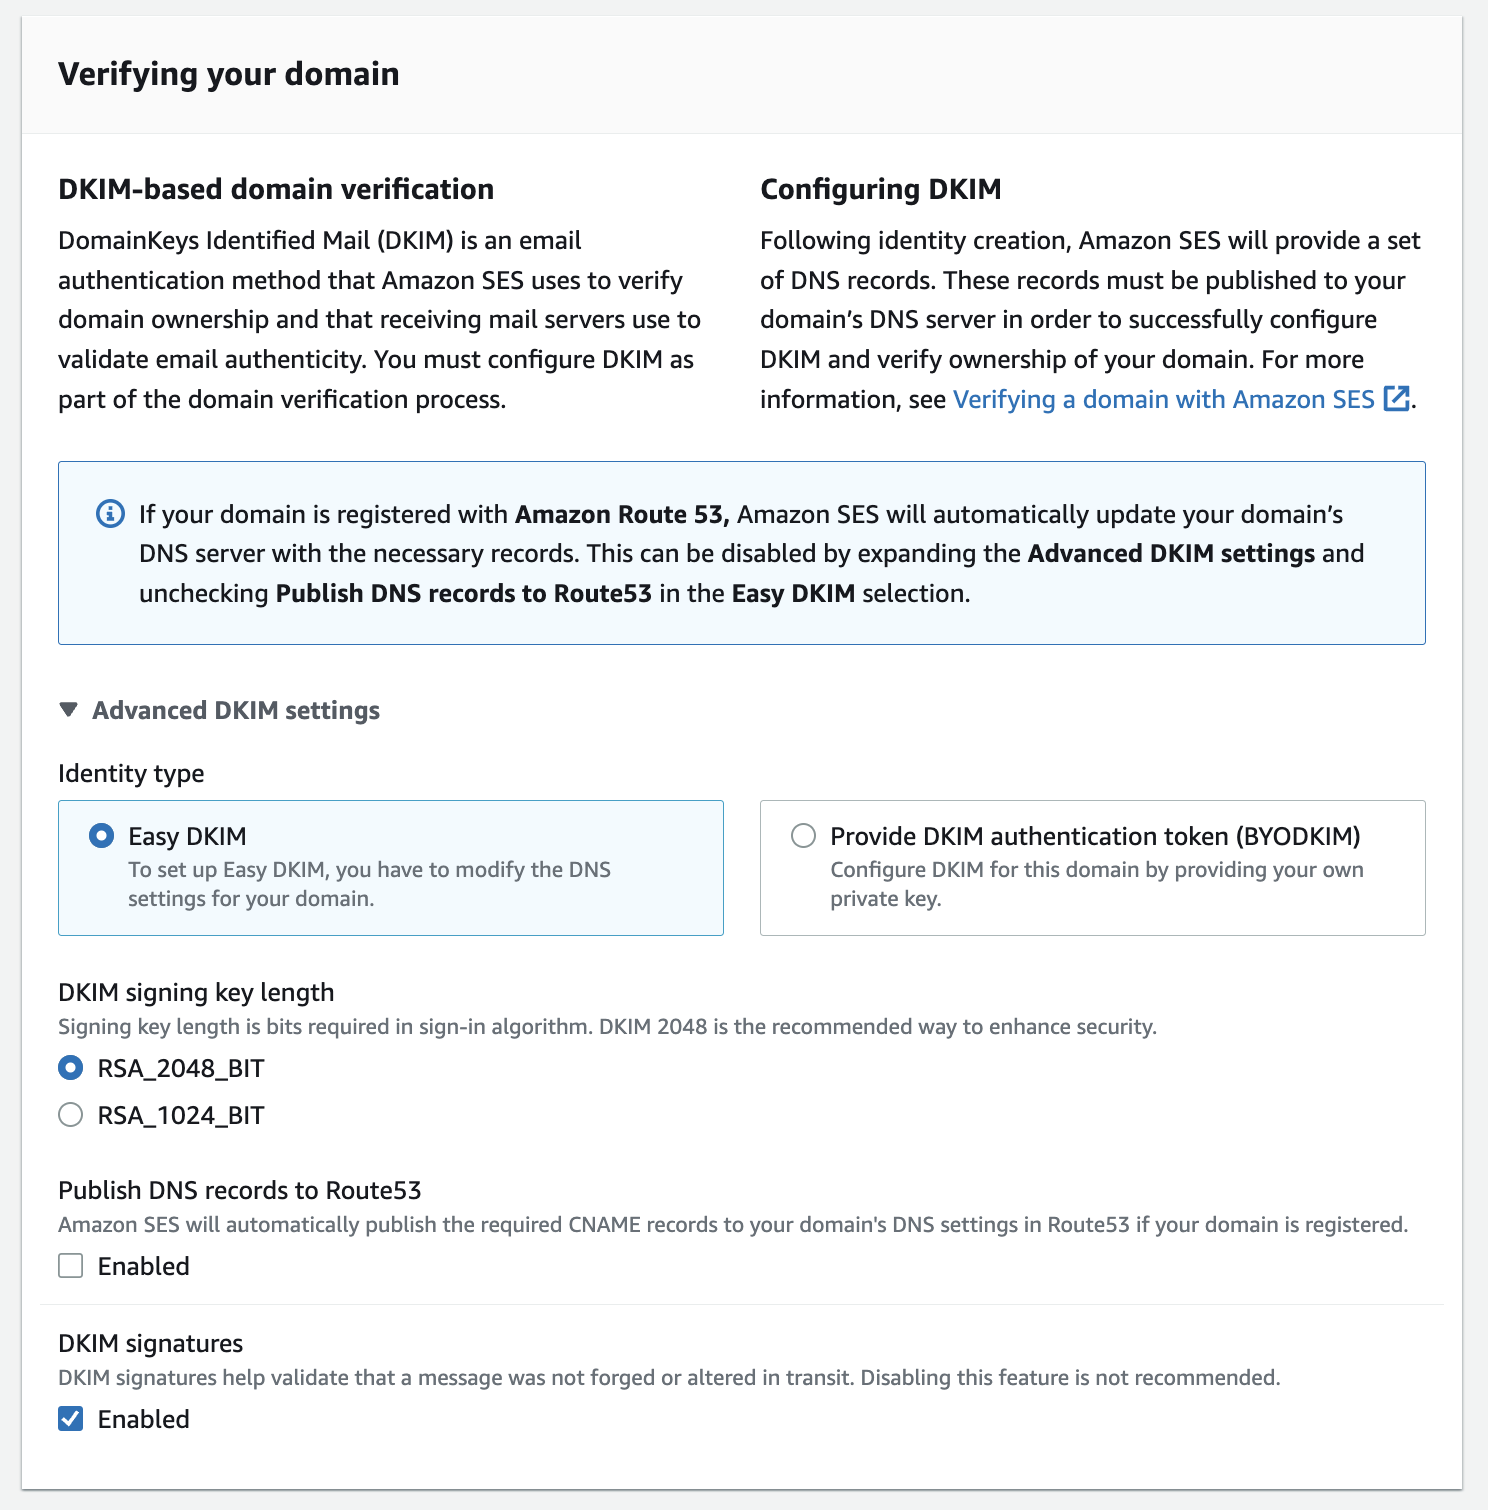
Click on “Create Identity”.
View domain summary in Amazon SES
You’ll now be routed to a page showing the summary of the domain. Here you can see the domain is marked as “Verification Pending”. This is because we have not yet added the needed DNS records on our domain to verify we own the domain and Amazon SES is authorized to send emails on our domain’s behalf.
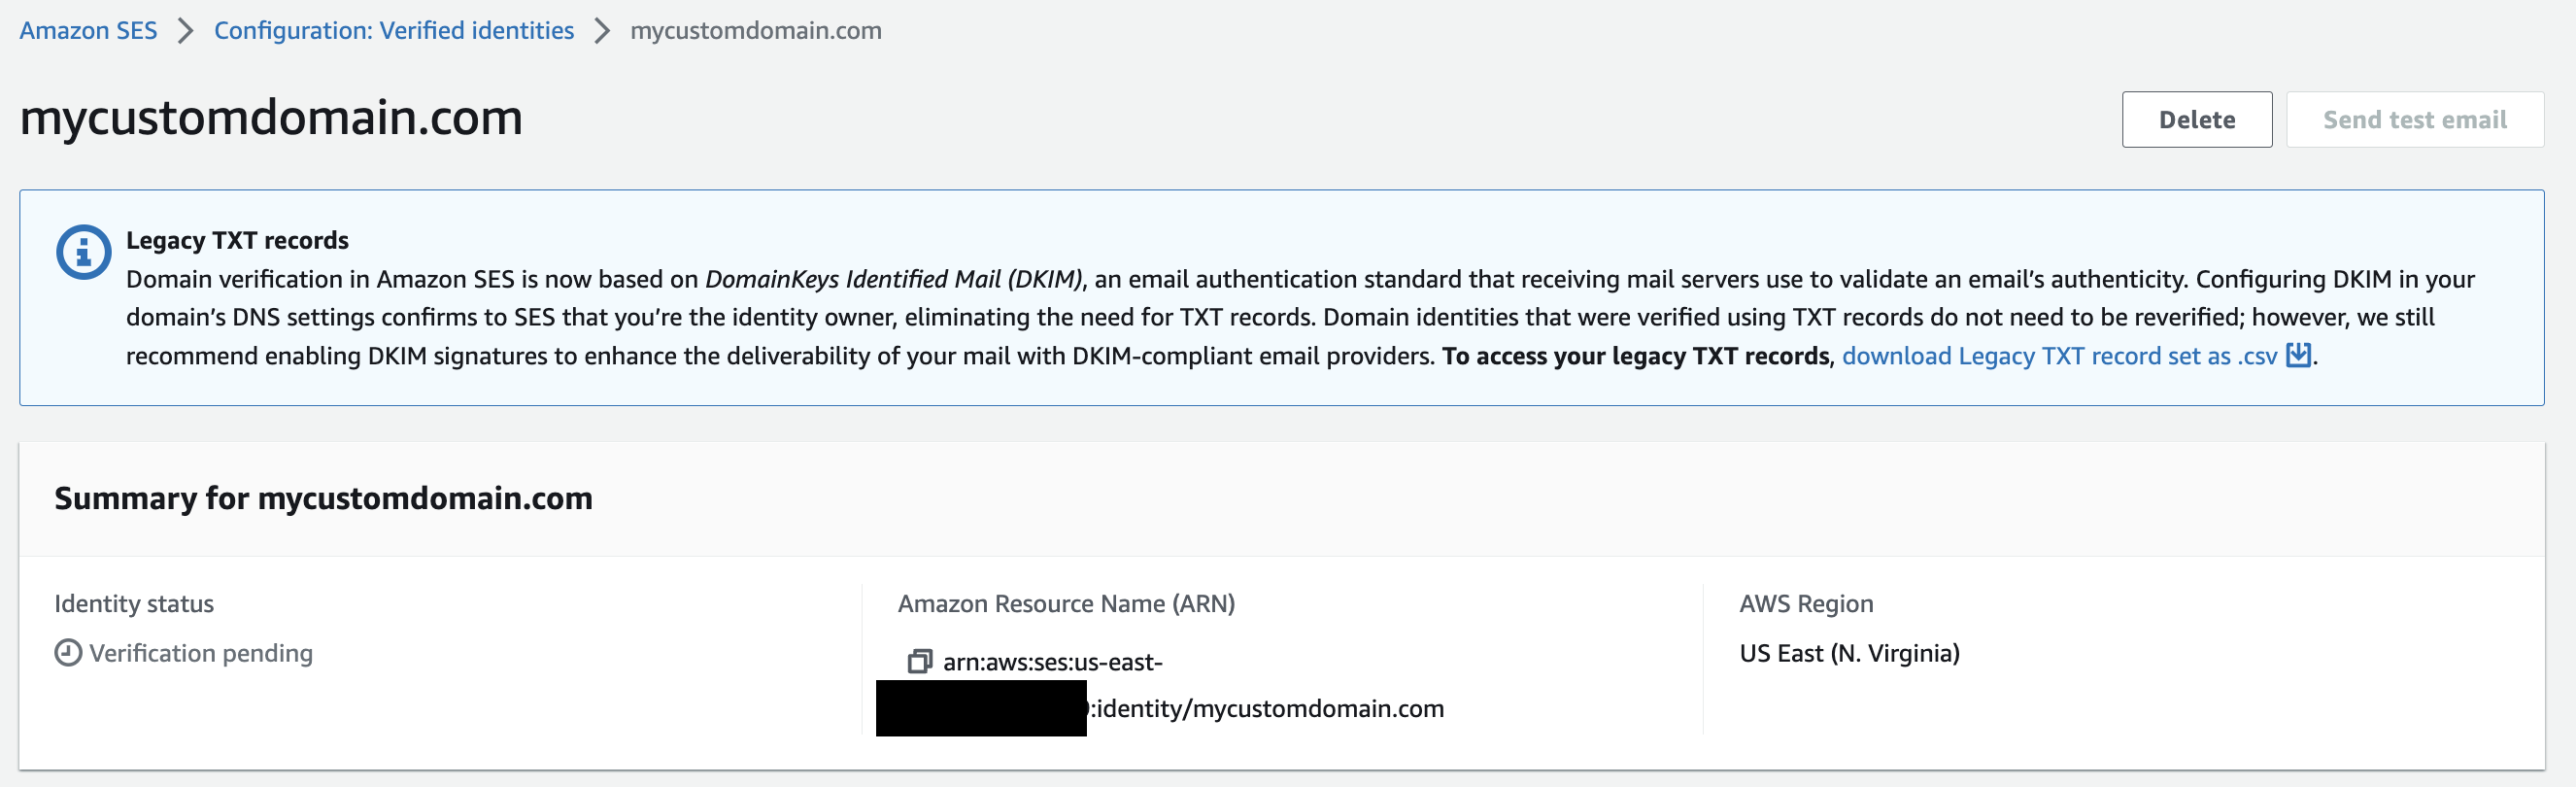
Scroll further down the page to the next section called “DomainKeys Identified Mail (DKIM)”. This section holds 3 CNAME records that need to be put in your DNS settings. If you are using Route53 and chose to automatically add the DNS settings earlier, then you are all set with this part and can skip the next section. If not we will add these records to our custom domain’s DNS now.
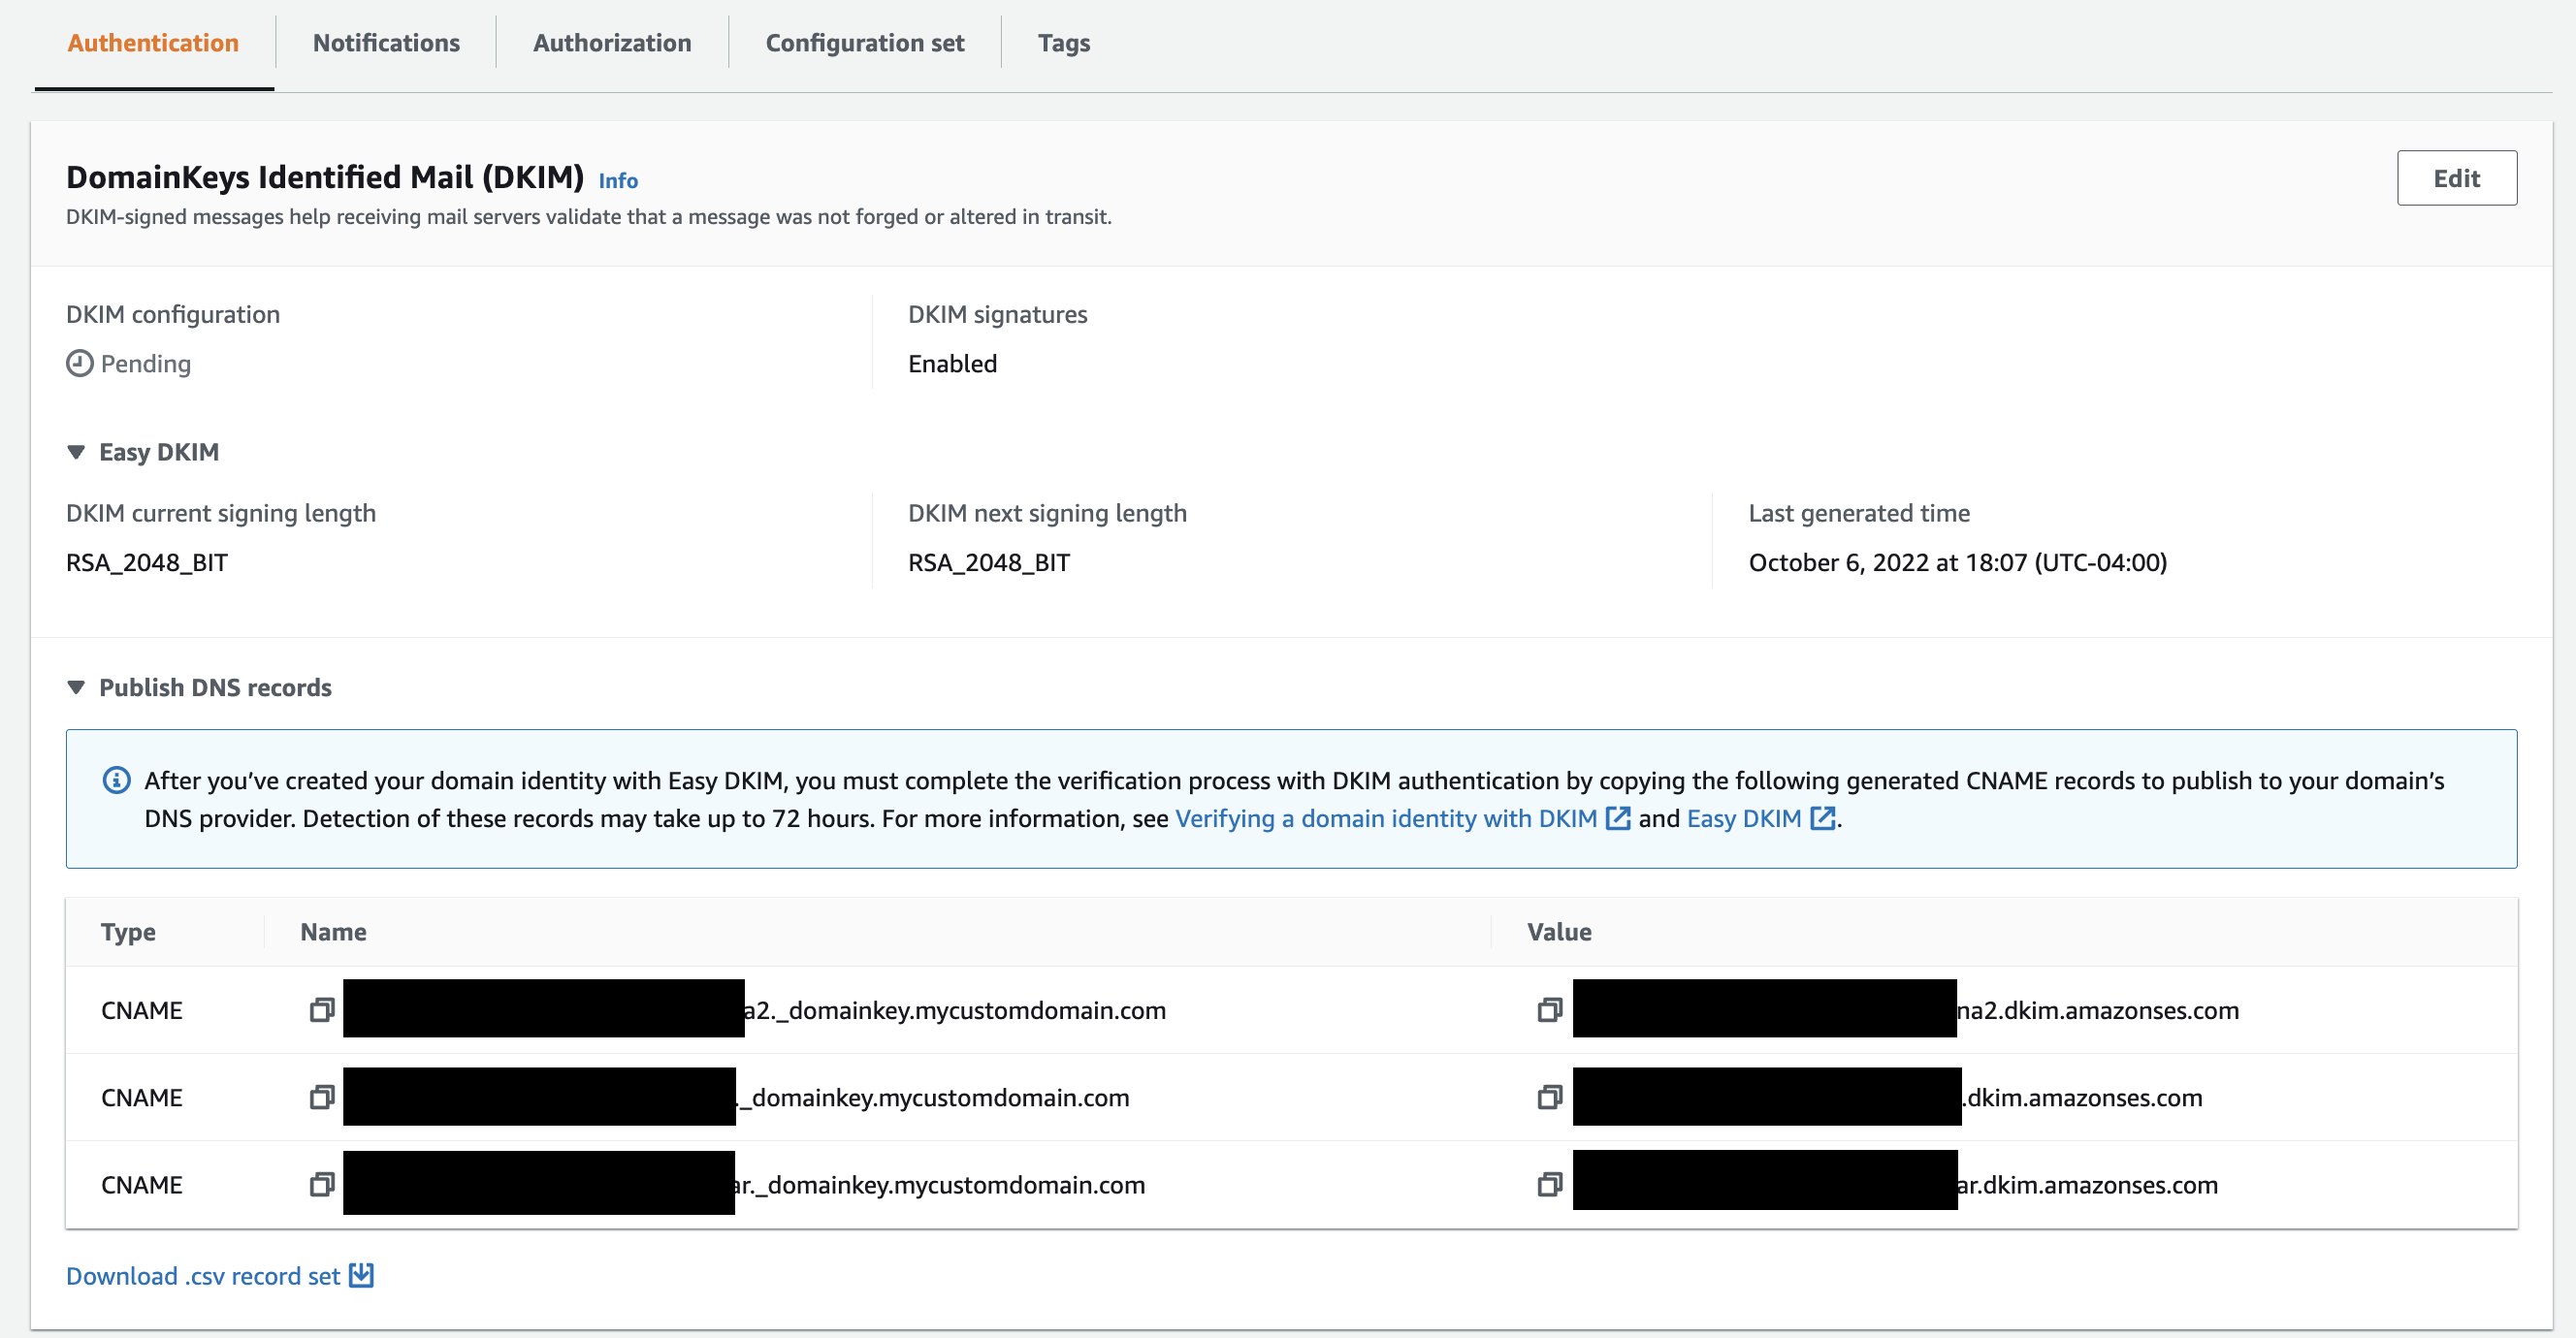
Add DKIM records to domain’s DNS
Open the DNS settings for your domain and add the 3 CNAME records to configure your DKIM message signatures.
If you aren’t sure where you manage your DNS, take a look at the website where you purchase the domain name. The DNS settings management page will likely be there.
💡 Careful when pasting the values, some DNS pages may try to help you by auto-completing part of the record so you may paste more than you need to.
You will add these as CNAME records in your domain’s DNS.
Once added, head back to the Amazon SES page’s DKIM settings section. After some time the DKIM configuration status should change from “Pending” to “Successful” and the domain summary should change to “Verified”
Configure custom MAIL FROM records
Next, we will set up the custom MAIL FROM domain.
If you recall, we provided mailfrom.mycustomdomain.com as the MAIL FROM domain in this example. This will be your MAIL FROM domain that email servers receive when they get a message from your domain.
Don’t confuse this domain with the “From” address you typically see on an email message. This is the envelope from address, and SPF utilizes that to verify the message sender is correct.
Again, I will refer to the excellent post from dmarcly.com for more info on the difference between the two “From” addresses where they go in depth on this topic.
Take a look at the MAIL FROM section of the Amazon SES page for your entity. You will see an MX and TXT DNS record.
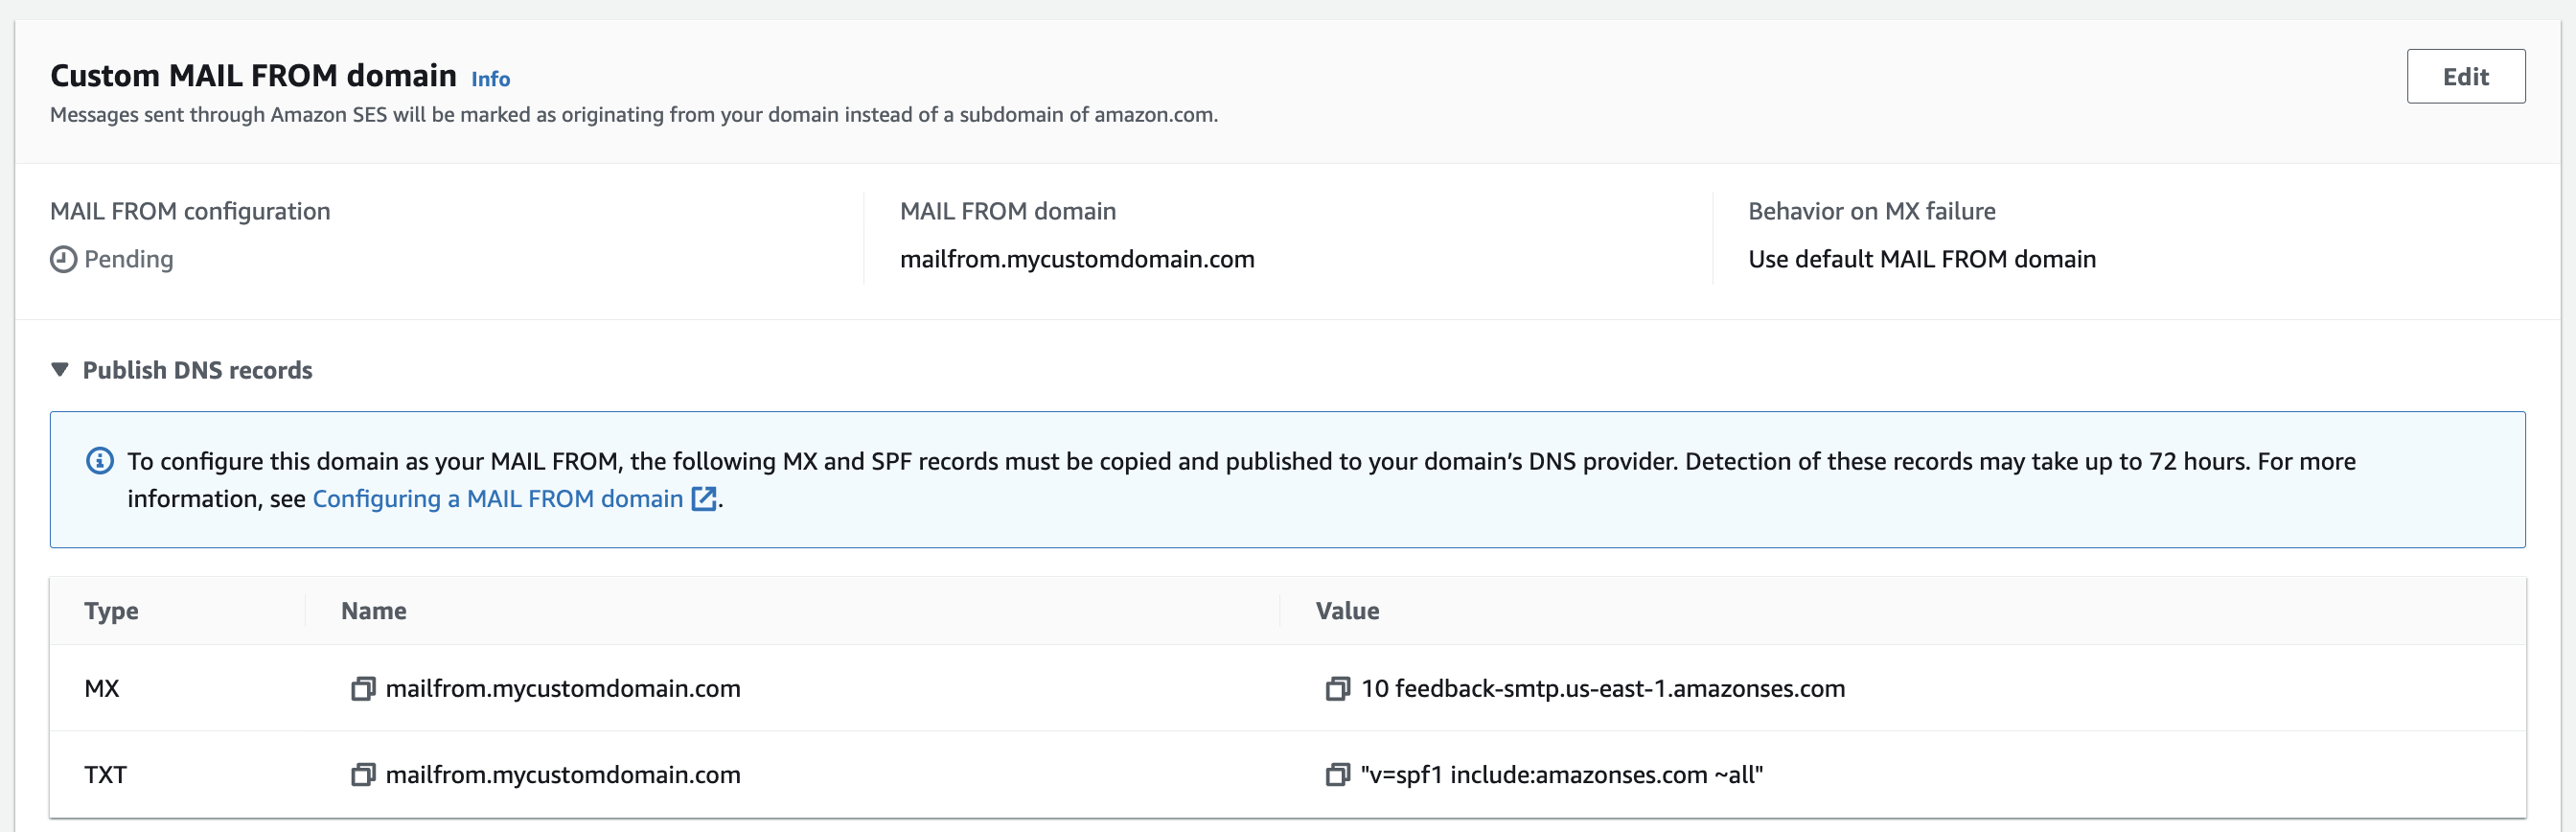
These two records will need to be added to your DNS settings.
The MX record defines Amazon SES as a mailer for your MAIL FROM subdomain.
The TXT record is used to configure SPF on our custom domain. The settings are as follows:
v=spf1= This is the version of the of SPF to utilize. This should always be set tospf1.include:[amazonses.com](http://amazonses.com)= This includes Amazon SES’s SPF record. Any IP address passing SPF authentication using this SPF record is allowed to send an email.~all= This controls what you’d like to do if an SPF validation fails for all SPF mechanisms defined by the Amazon SES SPF record. The~means failure for all mechanisms will result in aSOFTFAIL. This means that typically a message failing SPF will be delivered but will likely be flagged as SPAM.
If this is properly set up Amazon SES will display a “Successful” indication under the MAIL FROM section.
One thing to note is that adding these will in no way will interfere with any mailers set on your domain name. The MAIL FROM subdomain is intended to be configured only for Amazon SES.
How to add the DMARC DNS record
As far as Amazon SES configuration is concerned, you should be all set. Your identity status should show as verified, and your DKIM and custom MAIL FROM domain status should show as successful. Now, let’s configure your DMARC record.
Head back to your DNS settings. You will be adding the DMARC TXT record.
Record Name
The TXT record is comprised of a name and a value. The name of the record will be _dmarc.mycustomdomain.com OR just _dmarc.
The exact name to use depends on your DNS manager. Some may require you type in the full domain to which you wan to set _dmarc. Others may already assume you are referring to a specific domain, so you don’t need to put the full domain name.
Record Value
The value for the TXT record looks like this:
v=DMARC1; p=quarantine; [rua=mailto:[email protected]](mailto:rua=mailto:[email protected]); adkim=r; aspf=r; pct=100; sp=quarantine;
This value includes a few different tags for the DMARC record, and there are more tags I will not apply in my example. Refer to the DMARC record section of the dmarcly.com site to get a full list of the options.
Below I will explain the tags we will be setting in this example:
v= The record version. Should always be DMARC1.p= The policy applied to emails that don’t validate. Change torejectorquarantine.quarantinewill issue a “soft bounce” of the email (it will send the email to spam folder),rejectwill tell the email to be bounced entirely.rua= The email address to send DMARC aggregate reports to. This is usually the web site’s admin email address. Note: Changing the tag torufwill send forensic reports instead. You can optionally set both.adkim= Specifies how strict or relaxed the rules for the email domain are for DKIM validation. If you set it tor(relaxed) it means your emails will validate just as long as the same domain name is used as the email sender. If you set it tos(strict) it means the email sender’s domain name must match exactly the sender configured on Amazon SES. For example if you sent an email from [email protected], the Amazon SES service must be configured to send emails from email.myapp.com or else it will not work.aspf= The same asadkimabove, but forspfrecord validation.pct= The percentage of emails that are treated to the DKIM policy. The lower the number, the less emails that will be required to meet the DKIM record’s policy.sp= The subdomain policy to apply to emails that fail the DMARC check. If you set tononethen you need to add a specific DMARCsppolicy on each subdomain you want to send email out from. If you set it torejectorquarantinethat policy will apply to all your subdomains.
Send a test email
With your DNS records set up on your domain, and a verified identity in Amazon SES, you can now send a test email to make sure you can send emails.
To send a test email simply go to the Verified Identities section in Amazon SES, select the verified identity in the list, and click on the Send test email button.
Entering any “from” email address, whether it exists or not, should work.
DMARC reports
As you noticed earlier, the DMARC record lets you set an email address to deliver aggregate or forensic reports. These reports give you insight on emails sent from your domain, and their deliverability. In this article I’ll simply point out you can configure this and these reports may be helpful to you. If you’d like to go in-depth on how these reports can help you, you can review the DMARC reports section of the dmarcly.com article. I can’t explain it any better than they can 🙂.
All done
You are all set! Amazon SES can now send properly authenticated emails from any email address with your domain name. In the next article in the series we will use our Amazon SES verified identity to create an email template, construct the template using the very cool MJML library, and send emails using the Amazon SES Javascript client.