11/27/2022
How to set up an Amazon SES transactional emailer with a custom template (part 2) -- The SES Javascript client

Amazon SES Templates
Welcome to part 2 of our Amazon SES transactional emailer series! In part 1, we went through the steps to how to configure Amazon SES and our DNS to send authenticated emails from our email domain. If you missed that article, check it out, then head back here.
We will now take a step further and learn how to use the AWS SES Javascript Client to create a template onto our Amazon SES account and send emails. We will also learn how to build our template layout with the MJML library.
Let’s get started!
💡 Just want the code? Here is a link to the Github project for this part of the series.
Requirements
Since this series is focused on setup with Node and Typescript, you will need a Node and Typescript environment set up. If you’d like a plain starter Node project to work with, check out this excellent Node and Typescript starter project.
We will work using this starter project for this article.
How to authenticate with Amazon SES
The Javascript client will need to authenticate with your Amazon AWS account. In order to do so we’ll need to create some credentials.
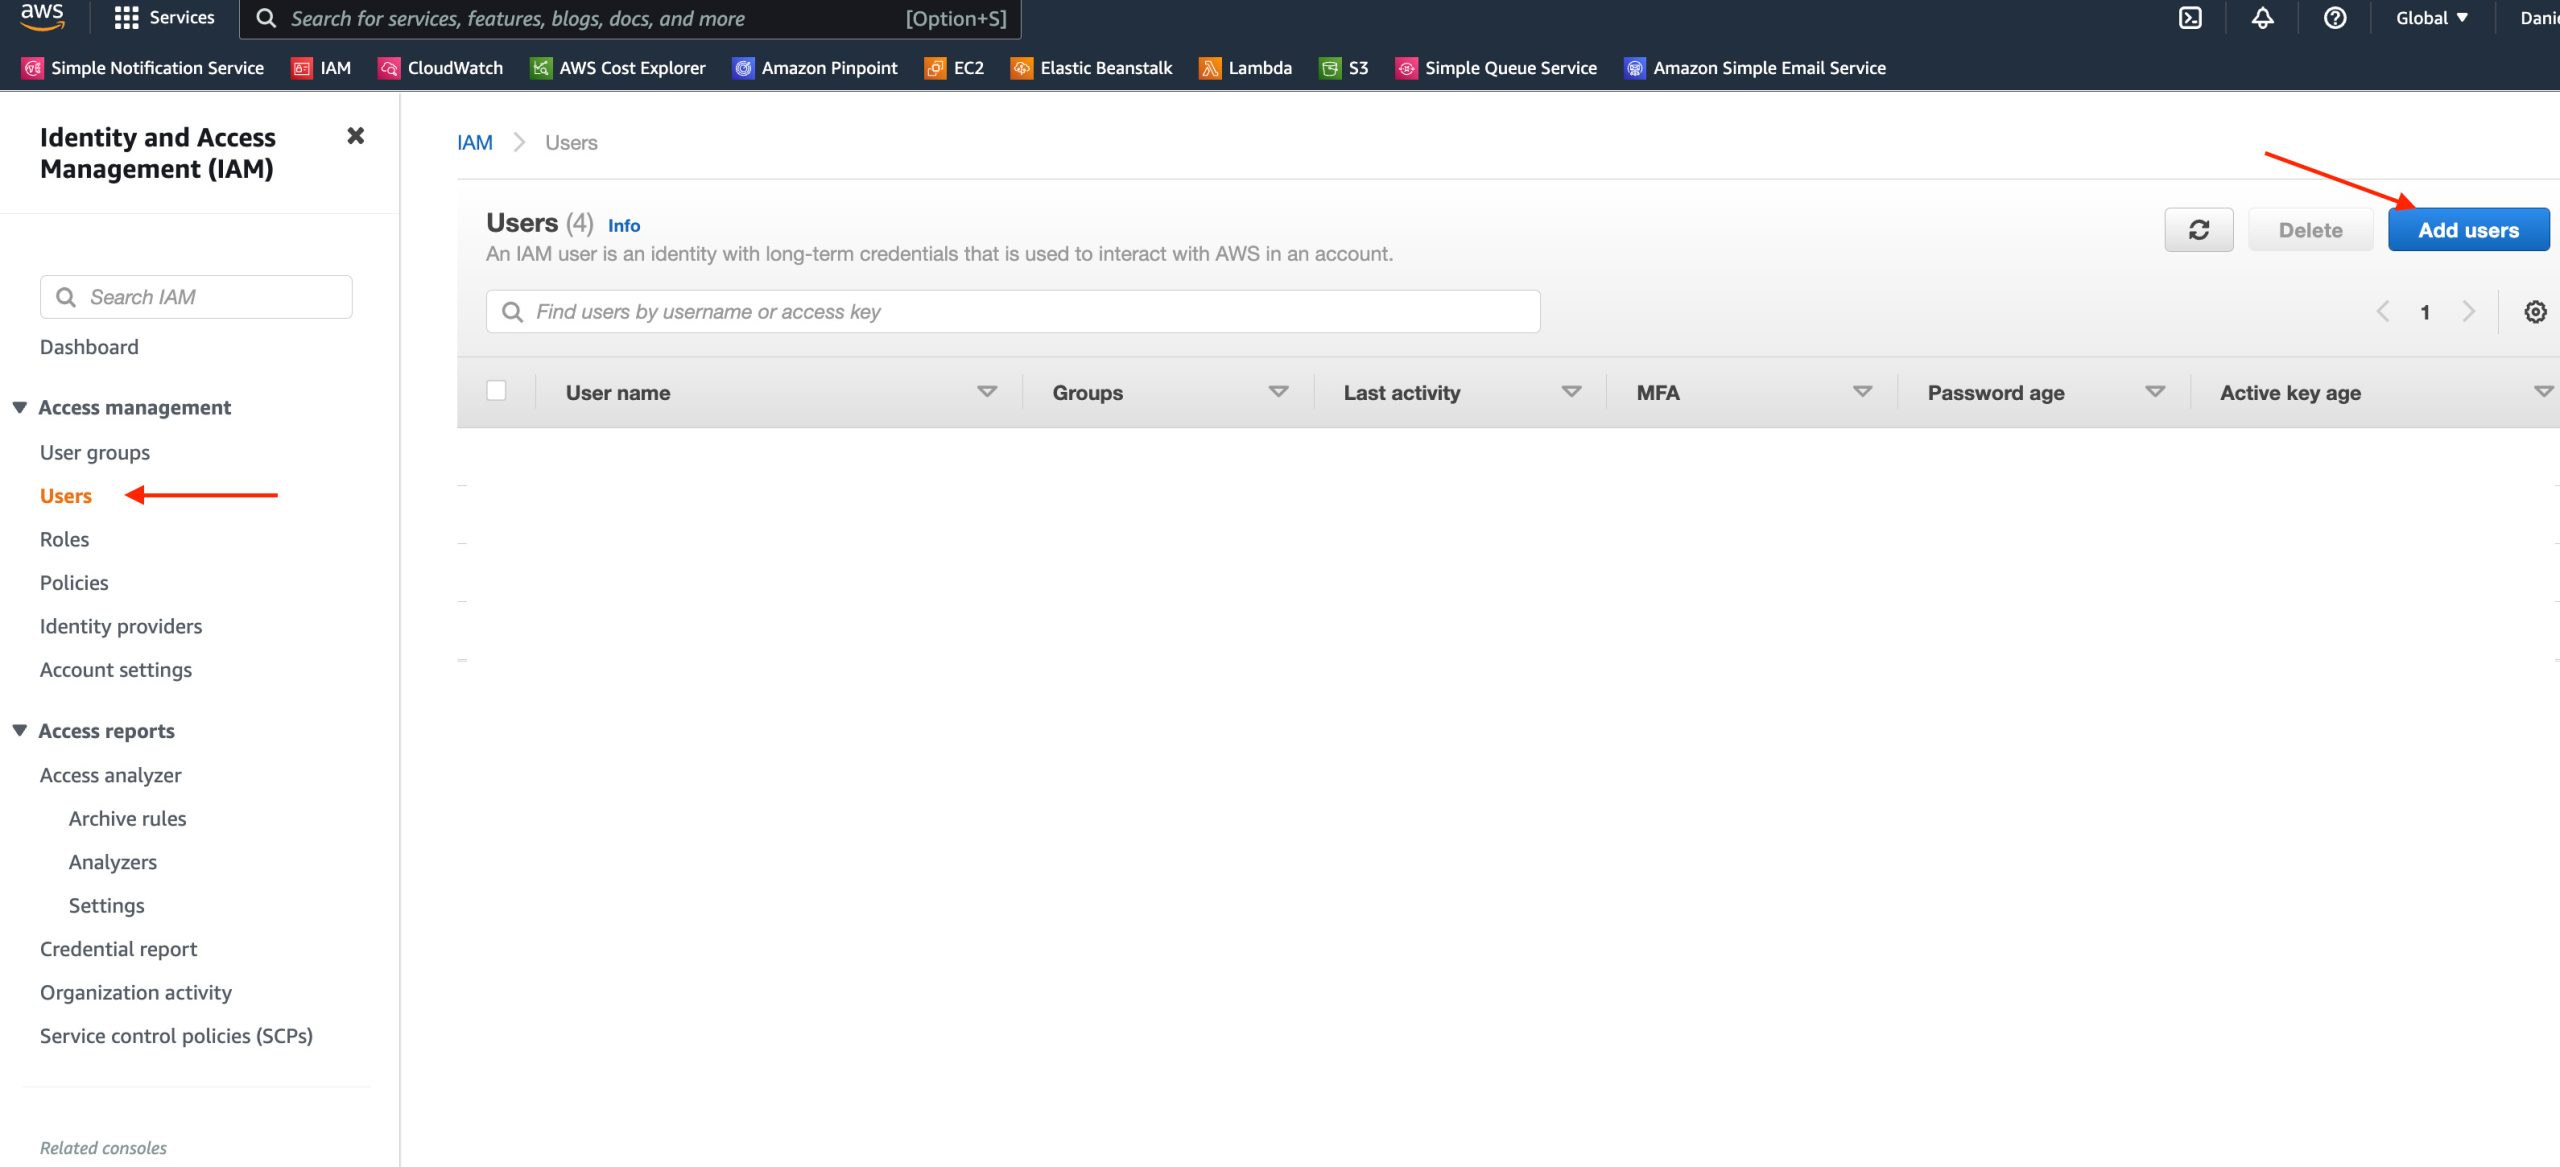
Find the IAM service in Amazon AWS. Click on the “Users” sidebar link and click on the “Add users” button:
In the next screen, in step 1, set a name for your user, and select “Access key - Programmatic access” as the credential type. This option will give us the access key id and secret access key that the Javascript client will require:
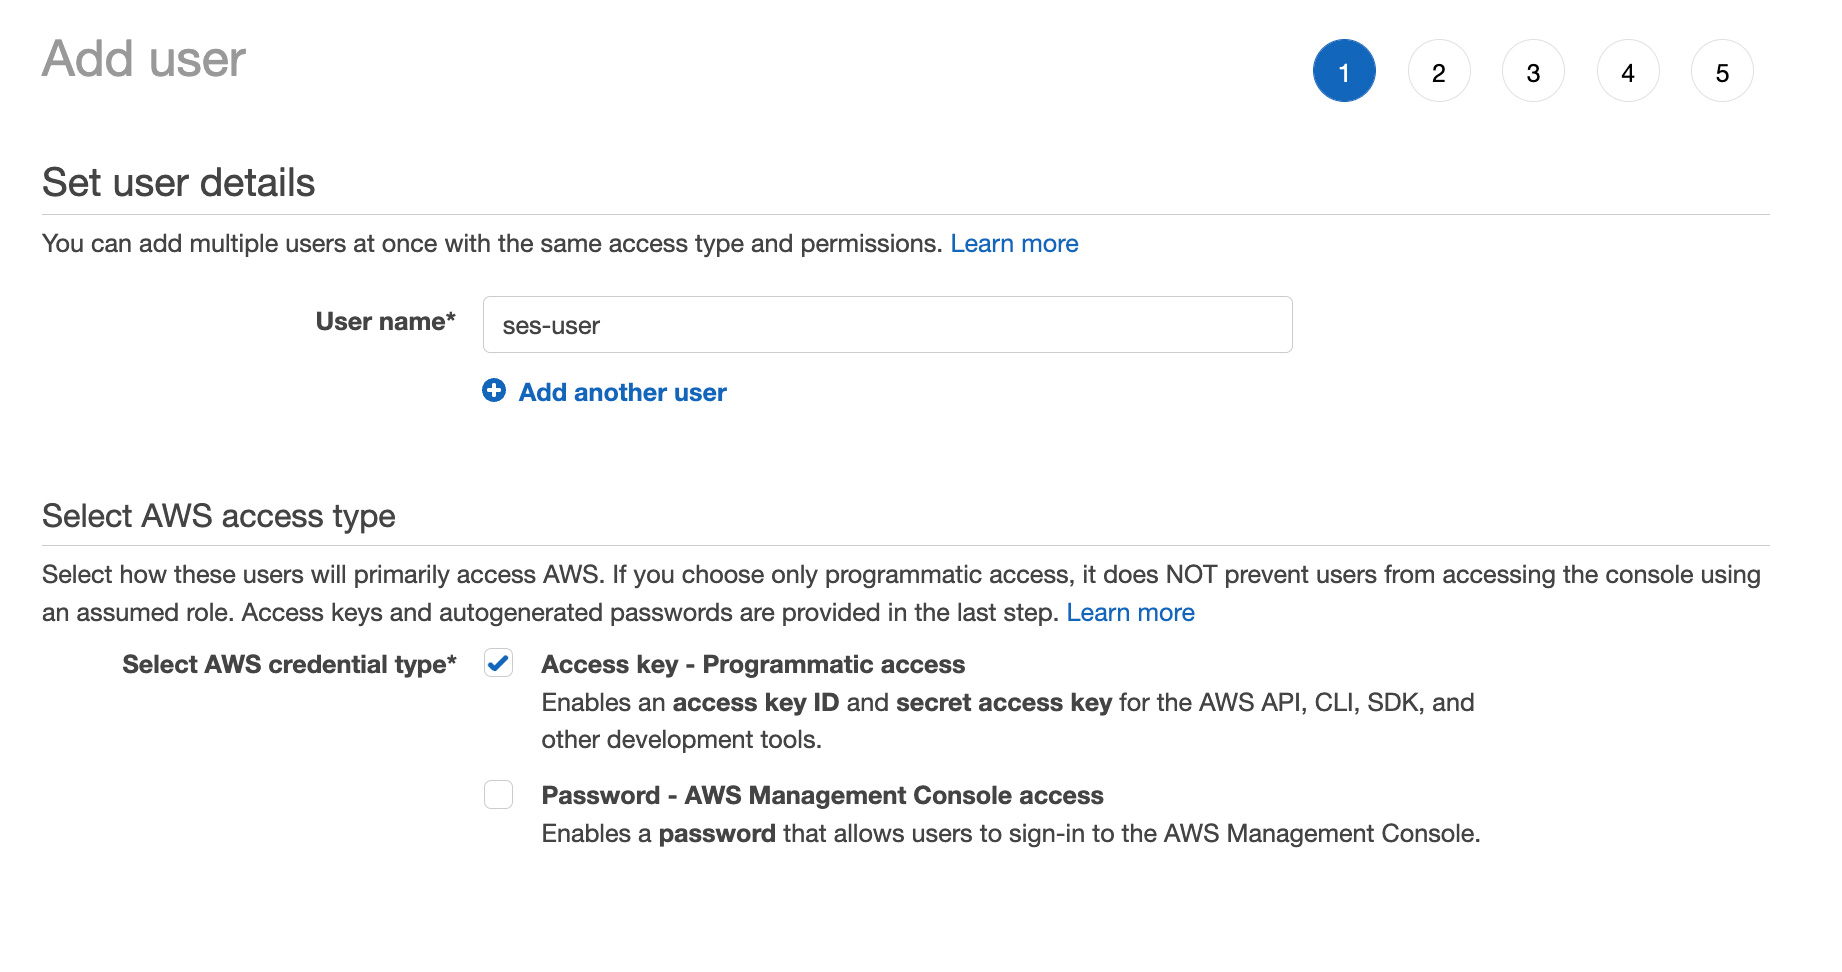
Click the “Next: Permissions” button at the bottom of the page to continue to step 2.
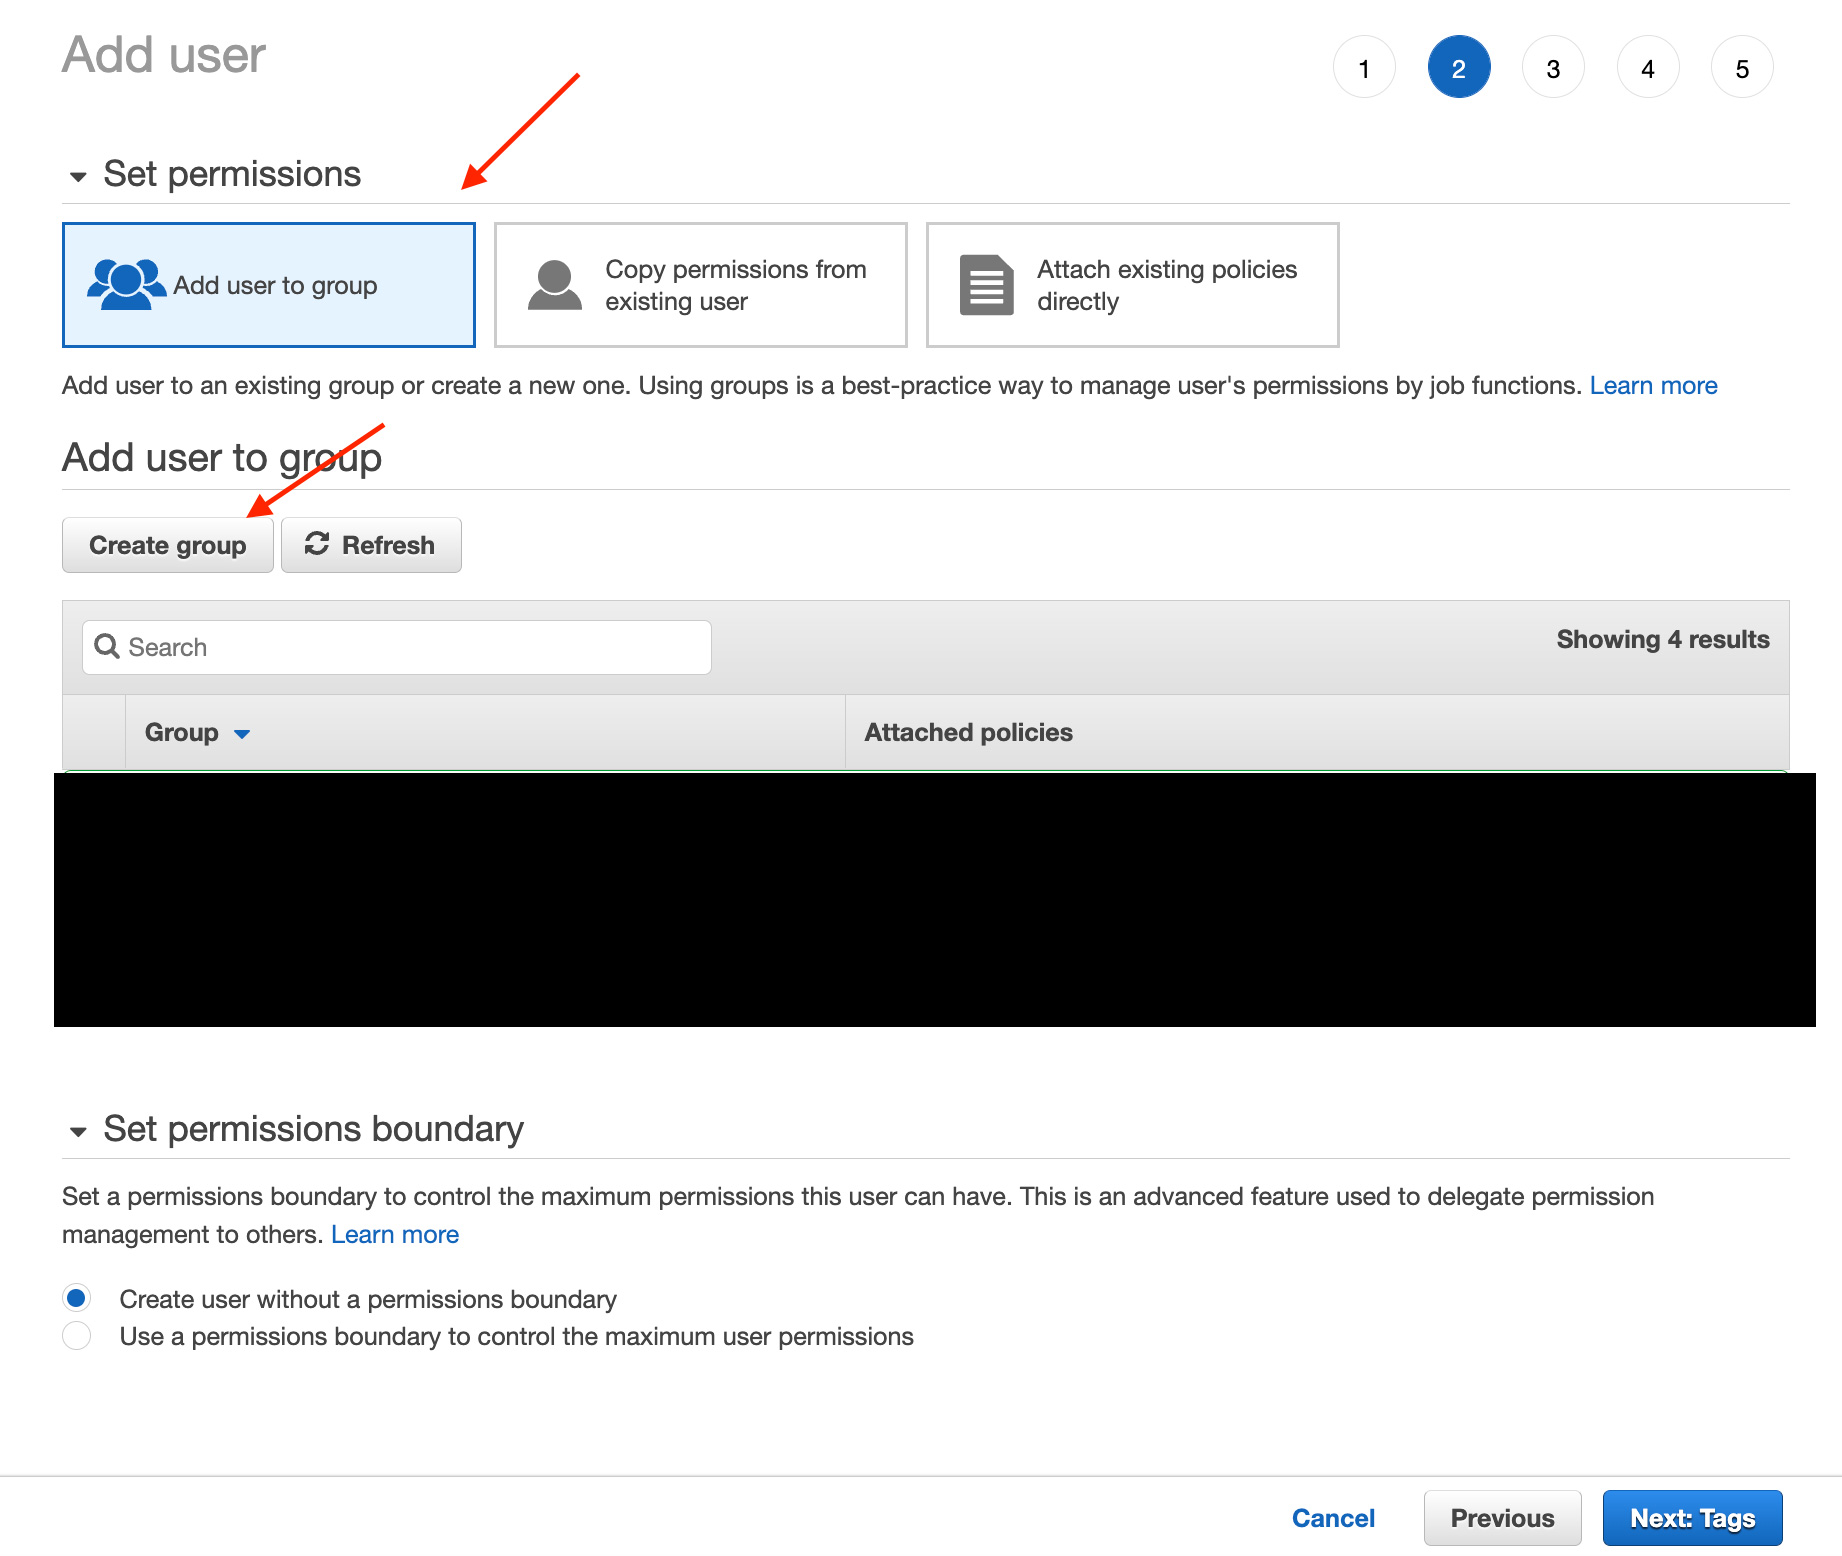
In step 2, you have different options for attaching the proper permissions to this user.
A little background:
We can limit our new user to only have access to the Amazon SES service. This lets us control what each user is allowed to do in our AWS account. We could also limit the user to perform only certain operations within Amazon SES if we wanted to.
In this case we will provide the user full access to the Amazon SES service, but not any other AWS service in our account.
Going back to our 3 options, here are our choices:
- Add user to group = We can attach permissions to groups to allow groups of users to inherit the permissions assigned to the group.
- Copy permissions from an existing user = If you have a user with the permissions you want, you can just copy those from that user with this option.
- Attach existing policies directly = You can attach permissions directly to this user.
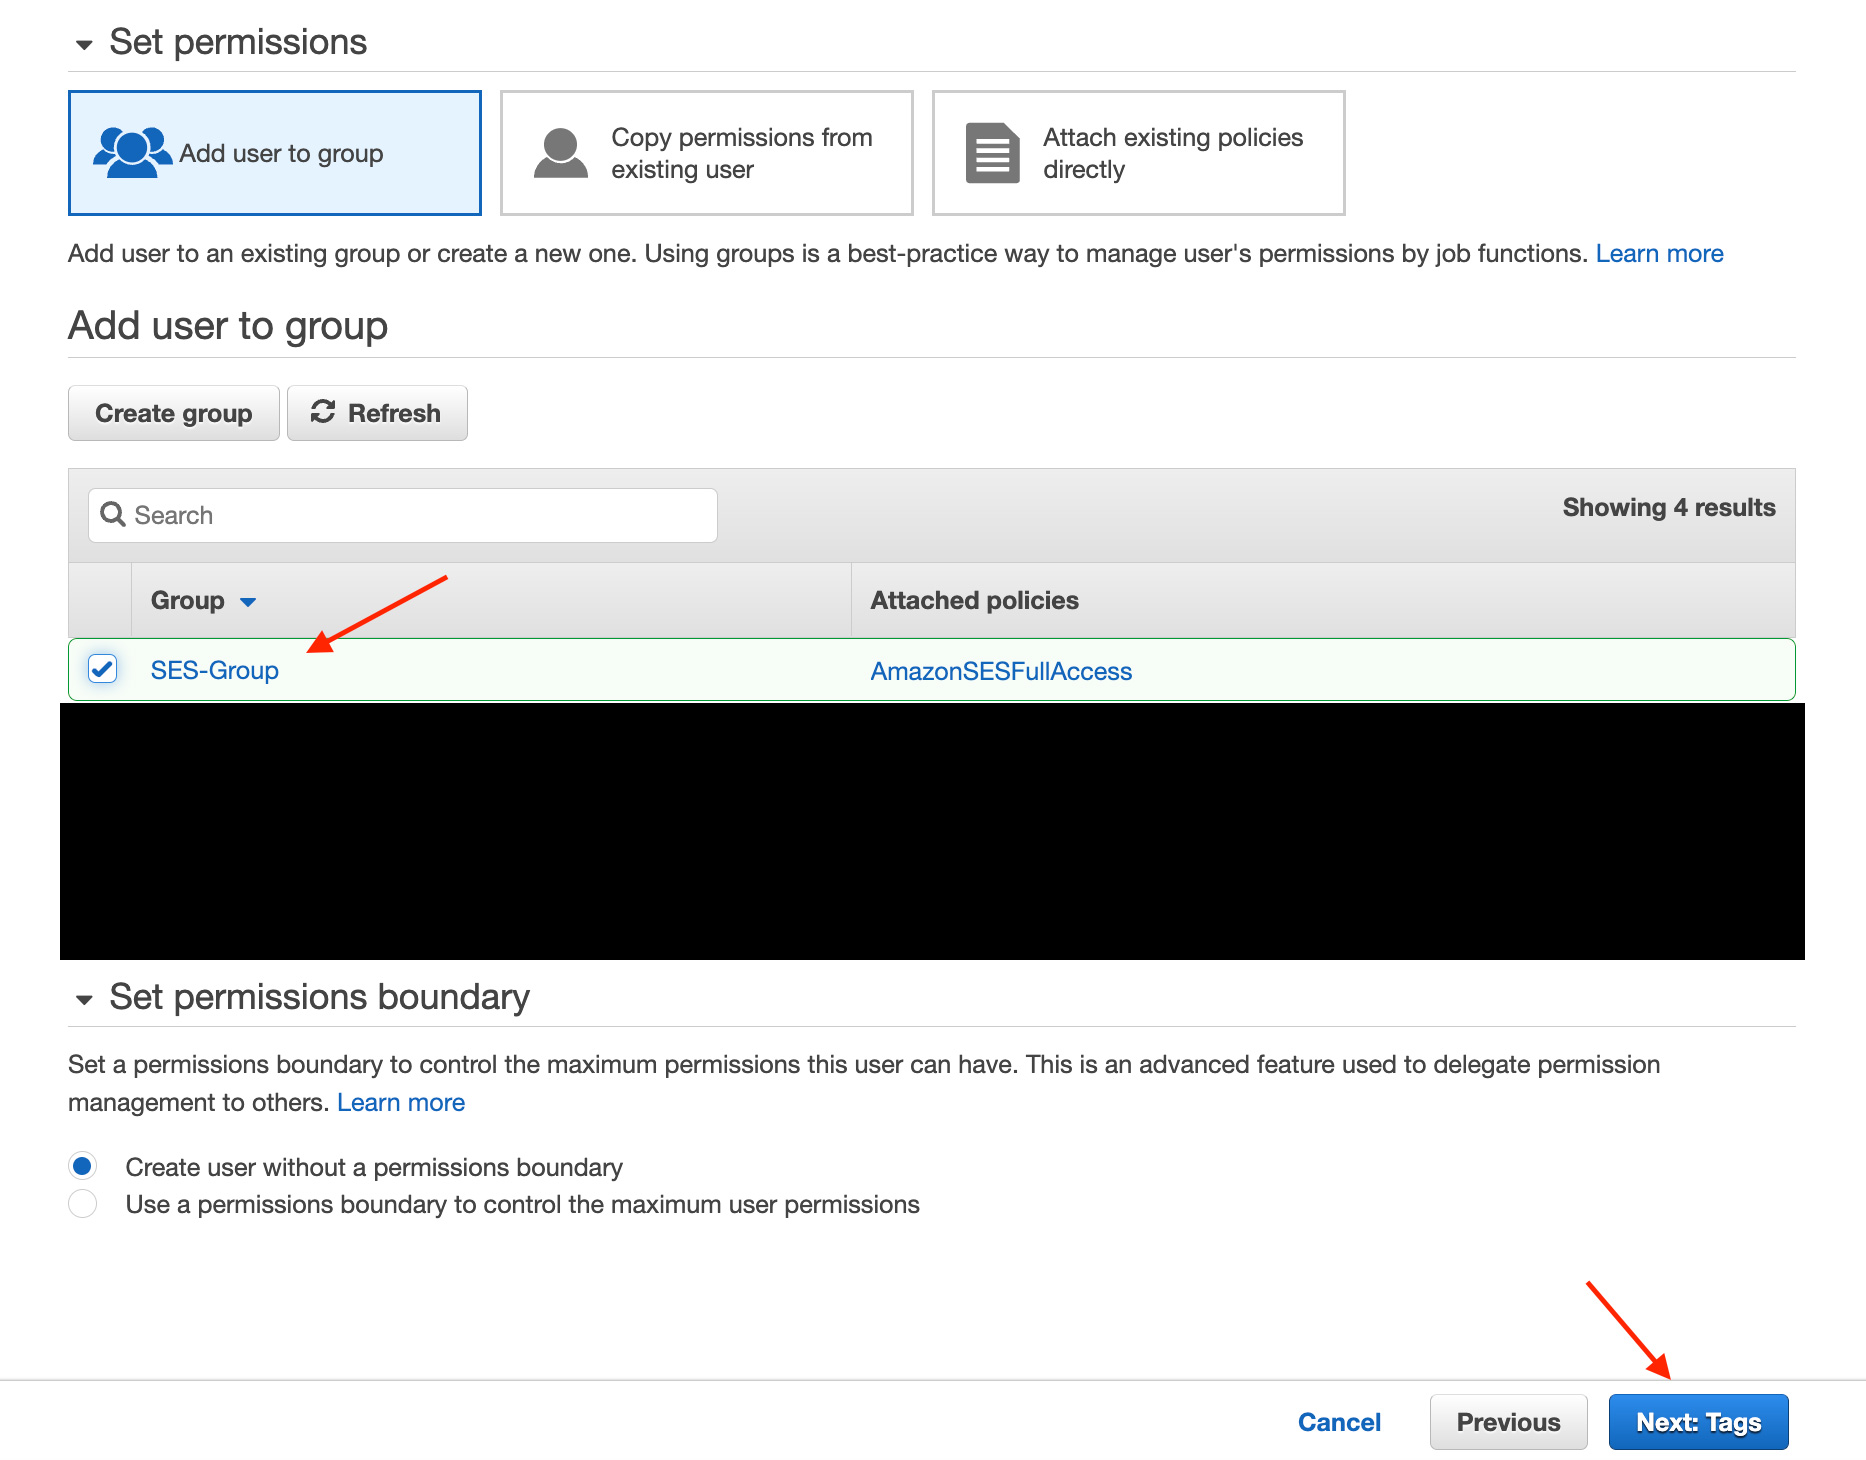
AWS’s preferred method is option 1. So let’s choose that option. Click on the “Add user to group” option on top of the page, and then click on the “Create group” button to create a new group:
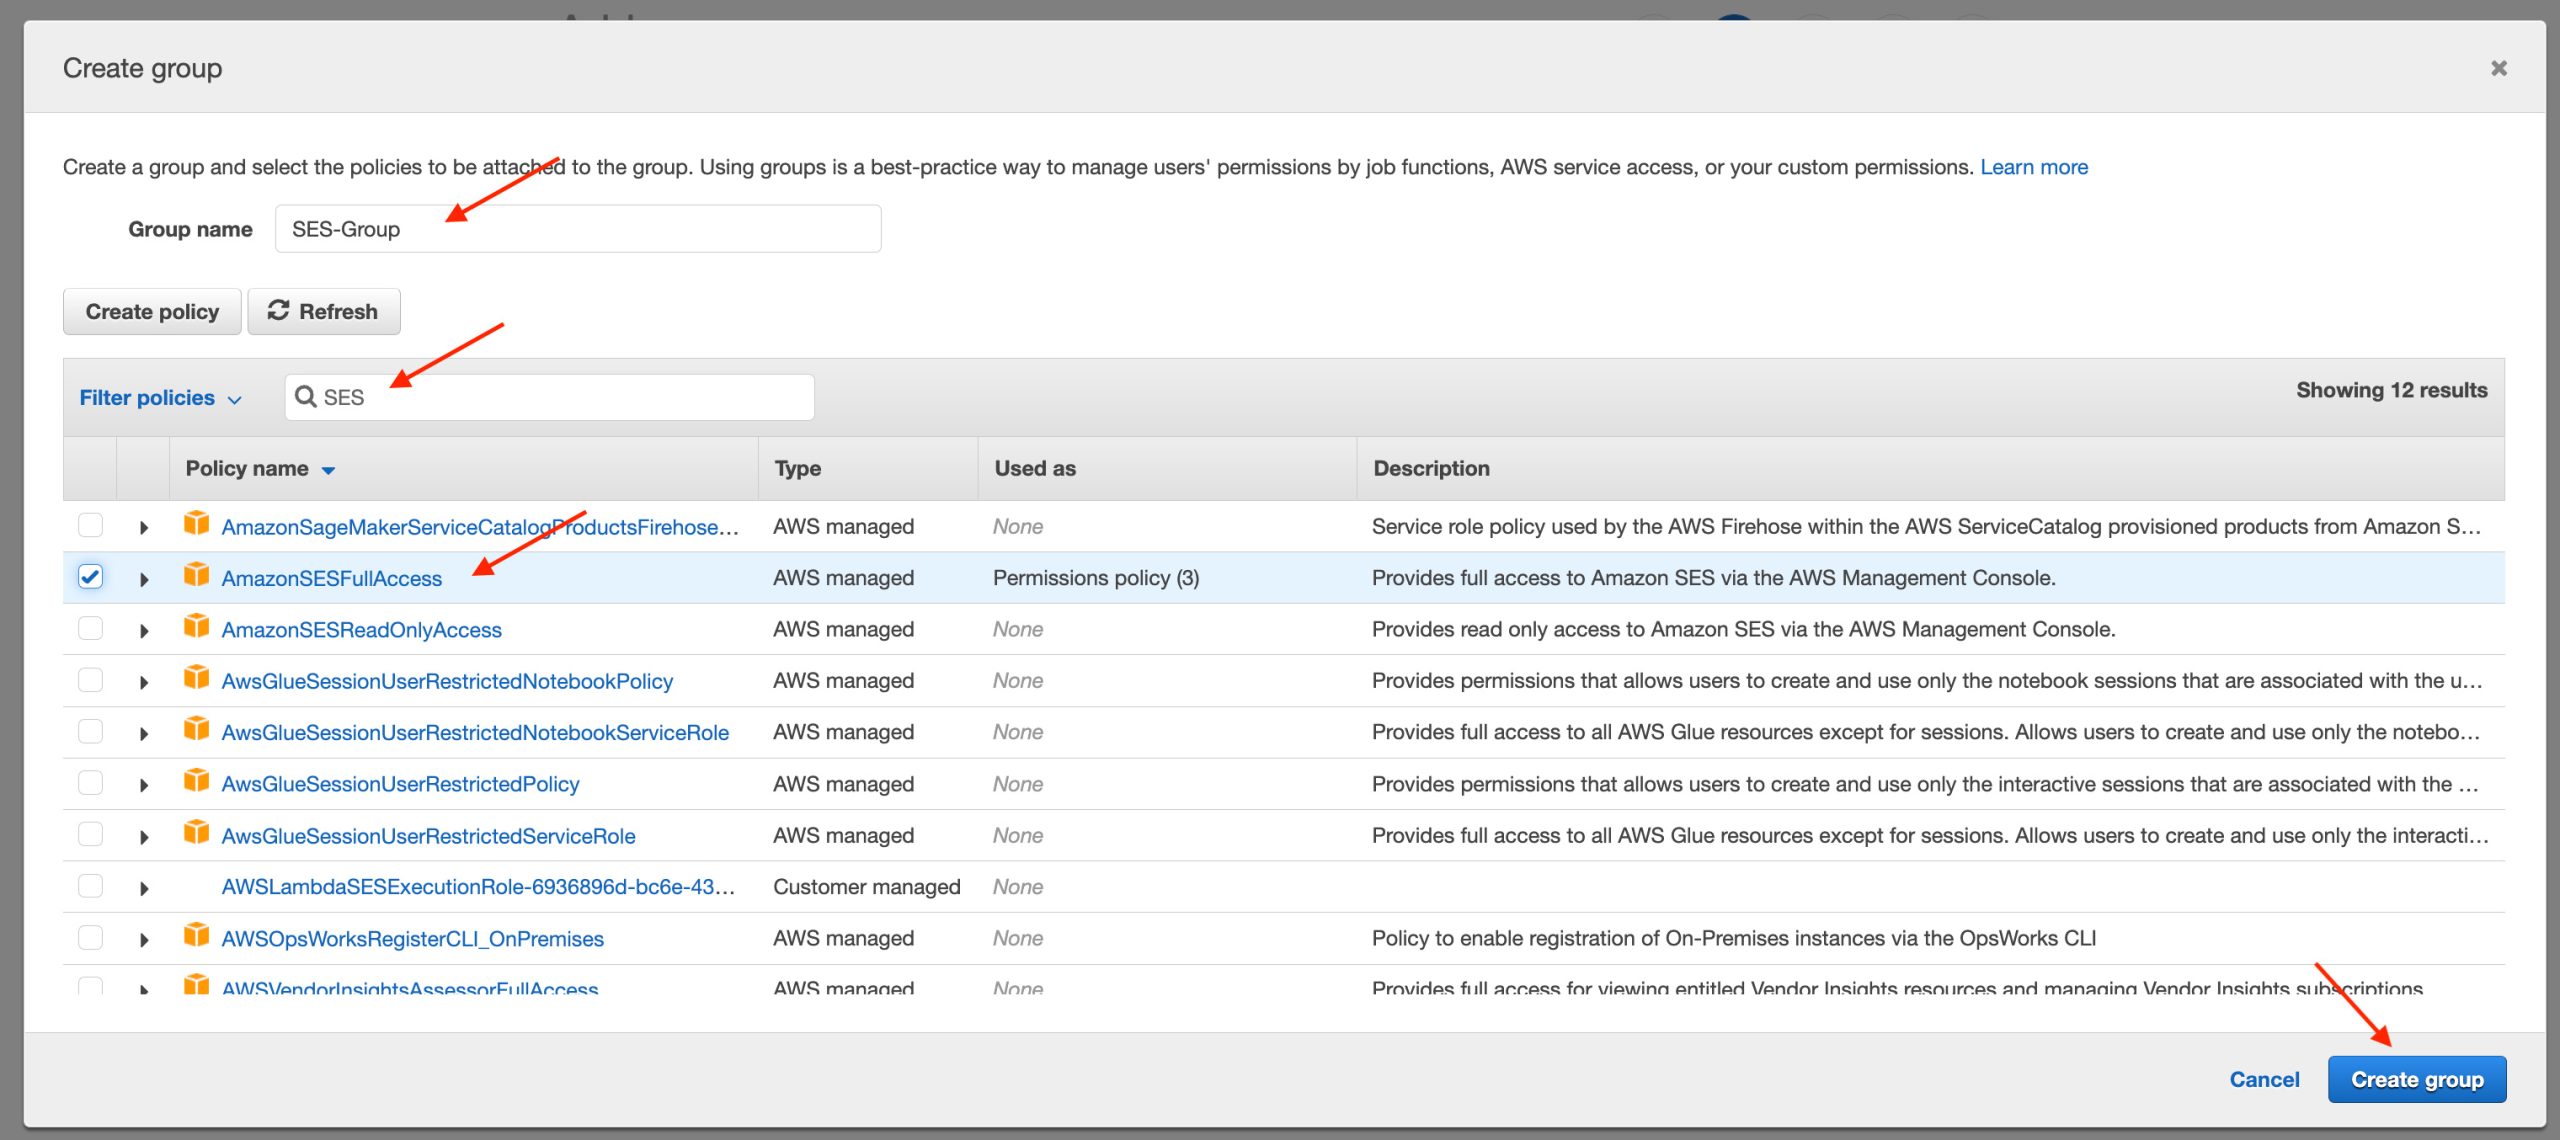
Call the group name “SES-Group”, and in the search field, type SES to find the SES related policies. Select the “AmazonSESFullAccess” policy, and click the “Create group” button:
Select the created group and click “Next:Tags” to continue:
Step 3 (tags) is optional. This lets you add some helpful key/value pairs to help you organize or track/control the user in some way. For our purposes we won’t need it, so let’s click on the “Next:Review” button to continue.
In step 4, review your settings and make sure they match the screenshot:
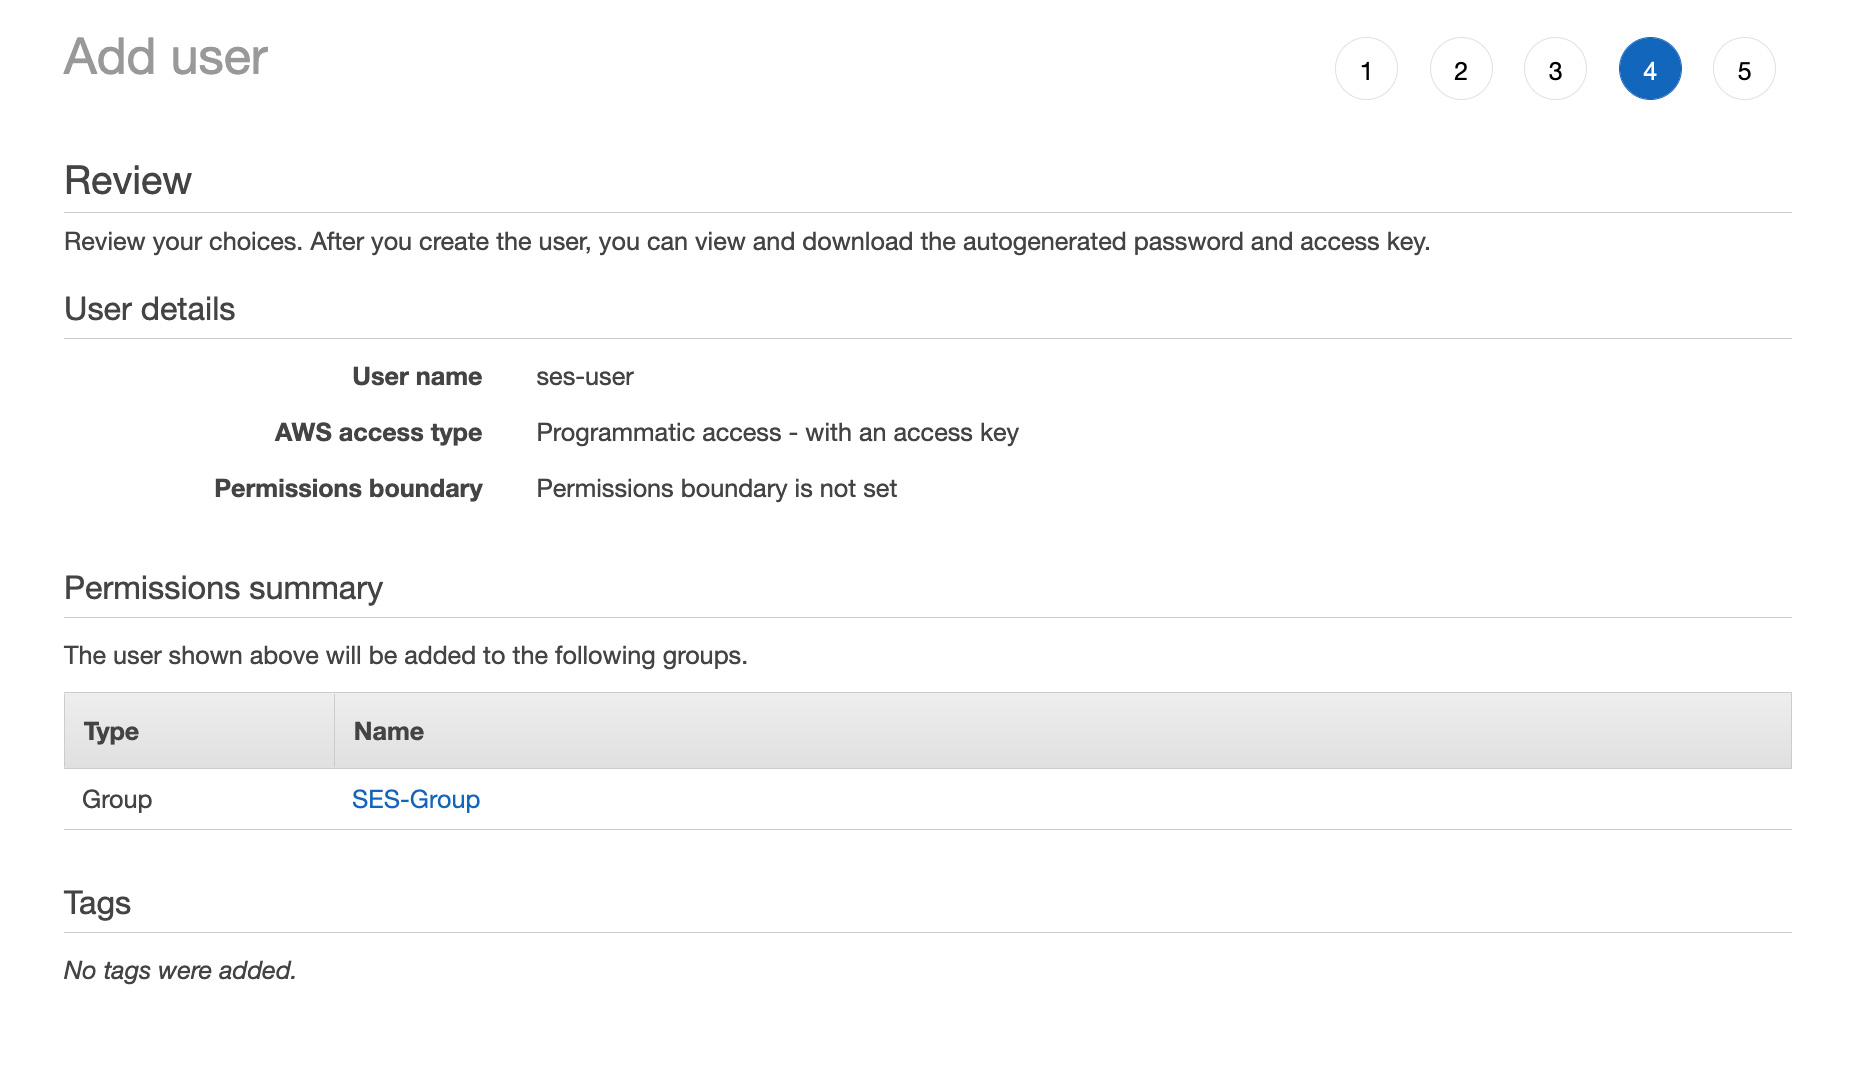
If all looks correct, click on the “Create user” button to create the user.
In step 5, you will get a confirmation of the created user. Here you have the opportunity to get the Access key ID and the Secret access key we will need. You can download the .csv file or copy the keys from the table:

We are now ready to set up our Javascript client 🎉
How to set up the Amazon SES Javascript Client
Like I mentioned earlier, we will use this simple typescript starter project to create out SES service class. Install the starter project, then continue with installation below.
SES Client Installation
Install the library with your command of choice:
npm install @aws-sdk/client-ses
yarn add @aws-sdk/client-ses
pnpm add @aws-sdk/client-ses
Create the SES service class and expose the send method
Create the class below inside the src directory and call it ses-service.ts. We will use it as our programs interface with the SES Javascript client.
import {
  SESClient,
  SendEmailCommand,
  SendEmailCommandInput,
  SendEmailCommandOutput,
} from "@aws-sdk/client-ses";
export default class SesService {
  public sesClient: SESClient;
  constructor() {
    this.sesClient = new SESClient({
      region: "us-east-1",
      credentials: {
        accessKeyId: "AWS_API_ACCESS_KEY_ID",
        secretAccessKey: "AWS_API_SECRET_ACCESS_KEY",
      },
    });
  }
  public send(params: SendEmailCommandInput): Promise<SendEmailCommandOutput> {
    return this.sesClient.send(new SendEmailCommand(params));
  }
}
region = AWS services are available in different regions. You’ll usually want to pick the region closest to your users. I chose us-east-1 but you can choose any other where Amazon SES is available. Learn more about AWS regions here. credentials.accessKeyId = Enter the AWS Access Key ID you copied earlier. credentials.secretAccessKey = Enter the secret Access Key you copied earlier.
Send a basic message
Let’s verify that our Javascript client can send out an email. In the index.ts file let’s import our service class and send an email:
import SesService from "./ses-service";
(async function () {
  try {
    const service = new SesService();
    await service.send({
      Destination: {
        ToAddresses: ["[email protected]"],
      },
      Message: {
        Subject: {
          Data: "This is the Subject",
          Charset: "UTF-8",
        },
        Body: {
          Text: {
            Data: "This is the message body",
            Charset: "UTF-8",
          },
        },
      },
      Source: "[email protected]",
    });
    console.log("Email sent.");
  } catch (e) {
    console.log(e);
  }
})();
Replace the [email protected] with the email address you want to send to. Replace [email protected] with the email address from your custom domain you want to send from. The email from your custom domain doesn’t have to actually exist. Since we verified the domain in [part 1], any email address using your domain name will work.
Run your program and verify that you do receive your test email. If you don’t, head back to [part 1] and verify you have set up Amazon SES properly.
Creating an email template
Let’s create an email template now. Email templates let us re-use an HTML layout when sending a message. We can also apply custom data into the template to display on the email message.
First, let’s add a method to our SesService class to create a template on Amazon SES:
import {
  SESClient,
  SendEmailCommand,
  SendEmailCommandInput,
  SendEmailCommandOutput,
  Template, //<-- add this import
  CreateTemplateCommand, //<-- add this import
} from '@aws-sdk/client-ses';
export default class SesService {
...
    public createTemplate(template: Template) {
    return this.sesClient.send(
      new CreateTemplateCommand({
        Template: template,
      }),
    );
  }
}
Now, let’s create a template. Replace the code in index.ts with the below:
import SesService from "./ses-service";
(async function () {
  try {
    const service = new SesService();
    await service.createTemplate({
      TemplateName: "welcome-email",
      SubjectPart: "Hello, {{name}}!",
      HtmlPart: "<h1>Hello {{name}},</h1><p>Welcome to {{appname}}.</p>",
      TextPart: "Hello {{name}},nWelcome to {{appname}}.",
    });
    console.log("Template created.");
  } catch (e) {
    console.log(e);
  }
})();
There’s a few fields that need to be set:
TemplateName = This is the name of the template which you will use to refer to it. When we send an email, we will specify this template name as the template to use for that email.
SubjectPart = This will display as the message’s subject. Notice the {{name}}. This serves as a placeholder for the data (the user’s name in this case), that will be set when we send the email.
HtmlPart = This is the HTML version of the message. We’ve added two placeholders for data.
TextPart = If the HTML version of the template fails to load on an email client, the text version is used instead. Here you can write the message as it would look like in plain text, and adding the same placeholders as we did on the HTML version.
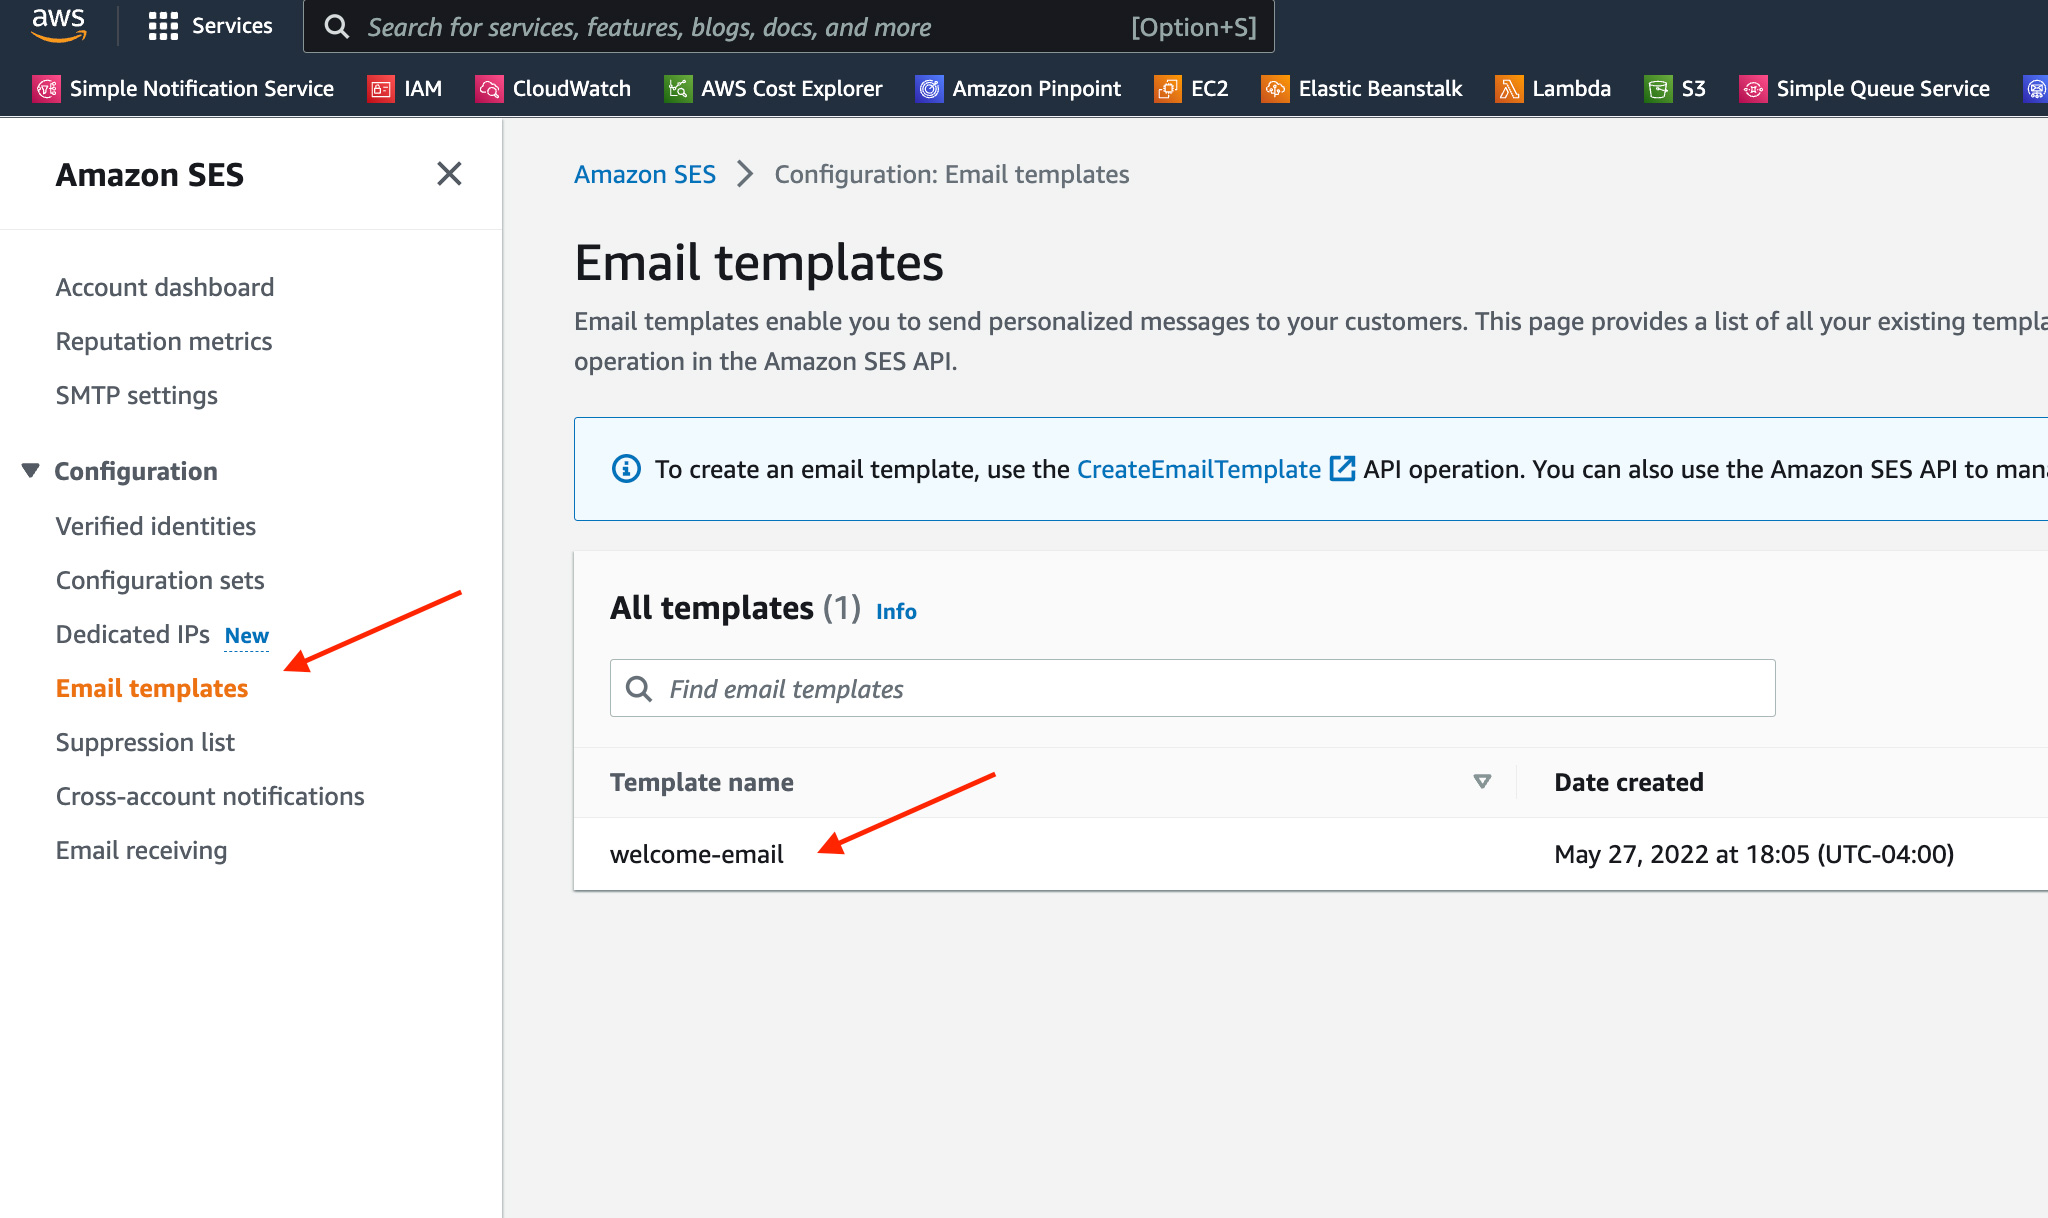
Review template entry in Amazon SES console
Once the template is created, let’s verify it exists in Amazon SES by going to your Amazon SES console and clicking on the “Email templates” sidebar link, and seeing the template name in the list of templates:
Applying the template to an email message
Let’s test sending an email now. We’ll need to add a new method to our SesService for that:
import {
  SESClient,
  SendEmailCommand,
  SendEmailCommandInput,
  SendEmailCommandOutput,
  Template,
  CreateTemplateCommand,
  SendTemplatedEmailCommandInput, //<-- add this import
  SendTemplatedEmailCommand, //<-- add this import
} from '@aws-sdk/client-ses';
export default class SesService {
...
    public sendWithTemplate(
    params: SendTemplatedEmailCommandInput,
  ): Promise<SendEmailCommandOutput> {
    return this.sesClient.send(new SendTemplatedEmailCommand(params));
  }
}
Now let’s send an email using this method:
import SesService from "./ses-service";
(async function () {
  try {
    const service = new SesService();
    await service.sendWithTemplate({
      Template: "welcome-email",
      Source: "[email protected]",
      Destination: {
        ToAddresses: ["[email protected]"],
      },
      TemplateData: JSON.stringify({
        name: "John",
        appname: "My Cool App",
      }),
    });
    console.log("Email sent.");
  } catch (e) {
    console.log(e);
  }
})();
Deleting a template
Now that we’ve verified we can create templates. Let’s delete this test template to clean things up. To do so, we’ll add a new method to our SesService class for deleting:
import {
  SESClient,
  SendEmailCommand,
  SendEmailCommandInput,
  SendEmailCommandOutput,
  Template,
  CreateTemplateCommand,
  SendTemplatedEmailCommandInput,
  SendTemplatedEmailCommand,
  DeleteTemplateCommand, //<-- add this import
} from '@aws-sdk/client-ses';
export default class SesService {
...
    public deleteTemplate(templateName: string) {
    return this.sesClient.send(
      new DeleteTemplateCommand({
        TemplateName: templateName,
      }),
    );
  }
}
Then we call the deleteTemplate method, passing the name of the template to delete:
import SesService from "./ses-service";
(async function () {
  try {
    const service = new SesService();
    await service.deleteTemplate("welcome-email");
    console.log("Template deleted.");
  } catch (e) {
    console.log(e);
  }
})();
Verify the template name no longer exists in the Amazon SES console’s Email templates page.
Using the MJML library for the email layout
Writing the template as a set of strings doesn’t sounds like a great developer experience. We will have a hard time tracking changes in our source control tool of choice, and writing easy to read HTML markup to make it responsive and code that is supported by many email clients.
Let’s improve on this by using a MJML which will let us write our template markup in a way that more closely lines up with how we write HTML normally. Our code will be supported by major email clients and it also has the tooling needed to help us create the HTML and text strings needed for creating our SES templates.
Installation
Head over to the download page of the MJML.io site to learn how to install it.
💡 You’ll notice the download page has links to plugins you can use to improve your experience in writing MJML on your favorite IDE.
Install the Typescript types using one of the commands below:
npm install --save-dev @types/mjml
yarn add -D @types/mjml
Writing the MJML template
The MJML documentation will help you understand the details on writing a complex template. For our purposes we will write a simple template, and just go over some of the basics of writing MJML. Here’s how our template will look like, you can save this file as welcome-email.mjml in the src/mjml directory:
<mjml>
  <mj-body>
    <mj-section>
      <mj-column>
        <mj-divider border-color="#3c0ac4"></mj-divider>
        <mj-text font-size="20px" color="#3c0ac4" font-family="helvetica">
          Hello {{name}}, welcome to {{appname}}.</mj-text
        >
        <mj-text font-size="16px" color="#000000">
          This is a welcome email from your application!
        </mj-text>
      </mj-column>
    </mj-section>
  </mj-body>
</mjml>
In the above template we used the following tags:
mjml = Similar to the html tag. It wraps the entire MJML markup.
mj-body = Similar to the body tag in HTML. All email content will go inside this tag.
mj-section = Acts as a “row” used to structure the layout. mj-section tags will “stack” vertically.
mj-column = Acts as a “column” used to organize content horizontally on desktop sizes, and will stack vertically on mobile.
mj-text = Used to render text on the layout. This must be used to render text.
As you can see the double bracket syntax for our data placeholders is the same as it is when defining a template for SES using a string.
Copying the .mjml templates to the build folder
Before we proceed with using our .mjml template, we’ll need to modify our project so that the .mjml template is automatically copied over to the build folder, so it can be found by our transpiled code.
To do so, first copy this script into package.json, inside the “scripts” key:
"copy:mjml": "cp -r ./src/mjml ./build/mjml"
Then, find the "build" script and modify it like this:
"build": "rimraf ./build && tsc && yarn run copy:mjml"
The modifications within the "scripts" key should look like this:
"scripts": {
    "copy:mjml": "cp -r ./src/mjml ./build/mjml",
    "build": "rimraf ./build && tsc && yarn run copy:mjml",
        ...
}
This will copy the templates over to the build folder when running yarn start.
If you are running the project to “watch” your changes using yarn start:dev, you’ll want to edit your nodemon.json file to look like this:
{
  "watch": ["src"],
  "ext": ".ts,.js,.mjml",
  "ignore": [],
  "exec": "ts-node ./src/index.ts && rimraf ./build/mjml && yarn run copy:mjml"
}
💡 Note: the cp command used to copy the files should work fine on MacOS/Linux, however if you are using Windows you should run your commands using git bash, or using the Linux subsystem. Alternatively, you can swap out the cp command for something that Windows won’t complain about.
Creating the Amazon SES template using the MJML template
In order to get our MJML template properly set as an Amazon SES template we’ll need to go through some steps. Here is an overview:
- Read the
.mjmlfile from the filesystem. - Convert the MJML markup into plain HTML for use with our Amazon SES’s HTML template part.
- Convert the HTML into plain text for use with our Amazon SES’s plain text template part (for cases where HTML can’t be loaded on the email client).
- Call our
createTemplateservice method we wrote earlier, and provide the HTML and text templates to it. - Verify the template was created in Amazon SES console.
Step 1: Loading the .mjml file
Let’s load the welcome-email.mjml file we created earlier into our program. Replace all contents of index.ts and write the below:
import path from "path";
(async function () {
  try {
    // Load .mjml file
    const mjMail = fs.readFileSync(
      path.join(__dirname, "./welcome-email.mjml"),
      "utf8"
    );
  } catch (e) {
    console.log(e);
  }
})();
Step 2: Convert to plain HTML
The MJML library we installed earlier has the utility we need to convert the MJML markup to plain HTML. Below we import the ‘mjml’ library to convert, and get the result stored in the html variable:
import path from "path";
import fs from "fs";
import mjml2html from "mjml";
(async function () {
  try {
    // Load .mjml file
    const mjMail = fs.readFileSync(
      path.join(__dirname, "./welcome-email.mjml"),
      "utf8"
    );
    // Convert MJML to HTML
    const { html } = mjml2html(mjMail);
  } catch (e) {
    console.log(e);
  }
})();
Step 3: Convert the HTML to plain text
Like I mentioned, we need a plain text version as a default in case the email client reading the email does not allow HTML to be rendered.
To convert the HTML to text we’ll install an additional utility called html-to-text. Install it with npm install --save-dev html-to-text or yarn add -D html-to-text.
For the Typescript types use one of the commands below:
npm i --save-dev @types/html-to-text or yarn add -D @types/html-to-text
Now let’s use the utility in our program:
import path from "path";
import fs from "fs";
import mjml2html from "mjml";
import { convert } from "html-to-text";
(async function () {
  try {
    // Load .mjml file
    const mjMail = fs.readFileSync(
      path.join(__dirname, "./welcome-email.mjml"),
      "utf8"
    );
    // Convert MJML to HTML
    const { html } = mjml2html(mjMail);
    // Convert HTML to plain text
    const text = convert(html, {
      wordwrap: 130,
    });
  } catch (e) {
    console.log(e);
  }
})();
See the html-to-text instructions to learn how you can configure the output of the text. For our purposes we just configured the wordwrap setting which tells the converter when to break to a new line.
Step 4: Create the Amazon SES template
With our HTML string and text default string, we’re now ready to create the Amazon SES template:
import path from "path";
import fs from "fs";
import mjml2html from "mjml";
import { convert } from "html-to-text";
import SesService from "./ses-service";
import { Template } from "@aws-sdk/client-ses";
(async function () {
  try {
    // Load .mjml file
    const mjMail = fs.readFileSync(
      path.join(__dirname, "./mjml/welcome-email.mjml"),
      "utf8"
    );
    // Convert MJML to HTML
    const { html } = mjml2html(mjMail);
    // Convert HTML to plain text
    const text = convert(html, {
      wordwrap: 130,
    });
    // Escape the HTML template
    const template: Template = JSON.parse(
      JSON.stringify({
        TemplateName: "welcome-email",
        SubjectPart: "Hello, {{name}}!",
        HtmlPart: html,
        TextPart: text,
      })
    );
    const service = new SesService();
    // Create the Amazon SES Template
    await service.createTemplate(template);
    console.log("Template created.");
  } catch (e) {
    console.log(e);
  }
})();
Run the program, and the template should be created!
💡 If you noticed the odd use of JSON.stringify and JSON.parse, this is a way to properly escape the HTML set on the template. This is necessary so the HTML is properly interpreted by Amazon SES.
Step 5: Verify the template was created in the Amazon SES console
Like we did earlier with out test template, we’ll need to verify the template was created. Head back to the Amazon SES console and verify it was (see the “Review template entry in Amazon SES console” section of this article again if needed).
Sending an email using the template
Sending the email is the same as we did with our test template too. Just call the service method for sending and pass the template name, and setting the dynamic parts:
import SesService from "./ses-service";
(async function () {
  try {
    const service = new SesService();
    await service.sendWithTemplate({
      Template: "welcome-email",
      Source: "[email protected]",
      Destination: {
        ToAddresses: ["[email protected]"],
      },
      TemplateData: JSON.stringify({
        name: "John",
        appname: "My Cool App",
      }),
    });
    console.log("Email sent.");
  } catch (e) {
    console.log(e);
  }
})();
Once sent, verify email was received. And you’re done!
Conclusion
This is the end of part 2 in our 3 part series for sending transactional emails with Amazon SES. In part 3 we will set up a project with scripts to automate the template creating process. See you there.